This post may contain affiliate links. If you make a purchase through links on our site, we may earn a commission.
Millions of gardeners compost. They save their kitchen scraps, pile up their leaves, collect their grass clippings, and hoard their coffee grounds. Then, they put all this “stuff” into a pile or a bin, and they wait. They wait for the process of decomposition to turn it into “black gold.” Maybe they turn the pile from time to time. Or maybe they don’t, because they know that eventually, they’ll get compost. But, do all of those gardeners really know what they’re doing? Do they understand the science behind composting? Do YOU? Many gardeners are surprised to discover how excitingly complex composting really is. To help demystify the composting process, I’d like to present this compost how to guide based on the science behind creating the “black gold” all gardeners covet.

Understanding the basics of the nutrient cycles
Most of us learned about nutrient cycles in middle school. We learned how ecosystems naturally recycle nutrients through the processes of life and decay. Plants are major players in both the carbon and nitrogen cycles as they photosynthesize, grow, transpire, decompose, or become part of the food chain. In an undisturbed ecosystem, plants are self-feeding, so to speak. In a nutshell, carbon, nitrogen, and many other essential plant nutrients are released back into the soil upon a plant’s death (or upon the digested plant being excreted by whatever organism ate it). As plant matter decomposes, the nutrients it contains go on to nourish another generation of plants.
Composting creates a sort of semi-artificial nutrient cycle. Yes, the nutrients are eventually recycled back into the soil, but instead of allowing plant and animal waste to sit around and naturally decompose wherever it falls, composting makes all the decomposition take place in one spot. The “waste” is condensed into a small area to break down, and then, once it’s fully decomposed, it’s spread back onto the garden where it can help nourish further plant growth.
These basics of nutrient cycling are important to understand because in order to maximize the speed and quality of your homemade compost, both the carbon and nitrogen cycles play an important role. Let me explain.

Compost how to guide: Begin by selecting the right materials
Any good compost how to guide will tell you that the first step in building a quality compost pile is choosing the proper ingredients. Different materials bring different things to the process of decomposition. There are two basic classes of ingredients constituting a proper compost blend: the carbon suppliers and the nitrogen suppliers.
- Carbon suppliers are materials added to the compost pile in a non-living state. They’re usually brown in color and have low moisture content. Carbon suppliers are generally high in lignin and other slow-to-decompose plant components, so they take longer to fully break down. Carbon suppliers include fall leaves, straw, hay, shredded newspaper, small amounts of sawdust, chopped corn stalks and cobs, and shredded cardboard.
- Nitrogen suppliers are those ingredients used in a fresh state. Nitrogen suppliers are often green in color (except in the case of manures) and have high moisture content. Because they contain many sugars and starches, they’re quick to decompose. Good nitrogen suppliers include untreated grass clippings, plant trimmings, farm animal manures (but not dog or cat waste), kitchen scraps, coffee grounds, rinsed seaweed, and other plant material.

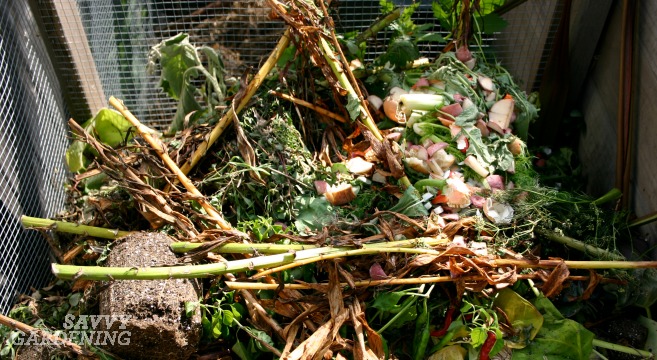
Properly made compost piles have the right ratio of ingredients.
The relative proportion of carbon suppliers to nitrogen suppliers is an incredibly important factor in determining both how well your compost pile breaks down and the quality of the finished compost. This ratio is called the C:N ratio, and it’s far more important than most gardeners realize. The target C:N ratio for a compost pile is 30:1 (meaning it contains thirty times more carbon than nitrogen). You can get this ideal ratio by building a compost pile that contains about two to three times more carbon-based brown ingredients than nitrogen-based green ingredients by volume (brown matter contains more carbon than green matter contains nitrogen, hence the seemingly odd ratio). So, for every five-gallon bucket of grass clippings you put in your pile or bin, you need to add two or three five-gallon buckets of straw or leaves to make the most of the science discussed in this compost how to guide. The ideal C:N ratio of 30:1 is not achieved by adding thirty times more brown matter than green matter since there is more carbon present in brown ingredients. It is achieved by adding two to three times more brown matter by volume.
Here’s why having the right C:N ratio in a compost pile is so important:
- The microbes love it. First and foremost, the microbes and other organisms that process whatever ingredients you add to your compost pile, use these carbon materials as a source of energy, and they need A LOT of it to work efficiently and quickly (more on these composting microbes in the next section). If the ideal C:N ratio is created, the days to finished compost are reduced because these organisms will be working at the fastest pace possible. In addition, piles with a C:N ratio of 30:1 reach up to 160 degrees F, while those with a C:N ratio of 60:1 will seldom get above 110 degrees F. Decomposition occurs faster at the ideal temperature of 160 degrees F, and perhaps most importantly, more pathogens and weed seeds are killed, an important item that should always be mentioned in a compost how to guide.
- There won’t be any nitrogen “borrowing”. If your compost pile doesn’t have the right C:N ratio, the finished compost will not have it either, and this can lead to some pretty unfavorable situations. For example, if finished compost with a C:N ratio much above 45:1 is spread on the garden, the microbes will actually “borrow” nitrogen from the soil as they continue to break down the organic matter in the compost. Microbes need nitrogen too, and if it isn’t in the compost, they’ll take it from the surrounding soil which may negatively affect plant growth. On the other hand, if the C:N ratio is too low (below 20:1) the microbes use all the available carbon in the compost and release the extra, unused nitrogen into the atmosphere, depleting the finished compost of this essential nutrient.

Whether you compost in a bin or a pile, microbes are hard at work breaking down the ingredients. - You’ll get quicker – and better – compost. Finished compost used on certified organic farms must have a measured C:N ratio between 25:1 and 40:1, but home gardeners don’t necessarily need their C:N ratio to fall exactly within this range. However, if your compost does, you’ll discover the pile finishes faster and the resulting compost is of exceptional quality.
- You won’t need to “water” your compost pile. The appropriate C:N ratio also prevents the need for additional supplies of water. However, if your compost pile ever appears dry, don’t hesitate to add extra water. Your pile should consistently feel like a wrung out sponge.
This compost how to guide cannot stress enough the importance of having three times more carbon suppliers than nitrogen suppliers in your compost pile. But, to get the best compost, it’s also important to understand and encourage the microbes who are doing all that work on your behalf.
Meet the composting microbes
Once the right ingredients have been used to create your compost pile, it’s the job of billions of microbes and other soil-dwelling organisms to break it down into compost. The organisms needed for this decomposition process are already present in most compost ingredients. However, throwing some finished compost into your pile as it’s being built may increase populations more quickly.
There are literally thousands of different decomposers at work in the typical compost pile, and they number in the tens of billions. They all do their part, and they do it year-round. Some species of bacteria continue to work even in freezing temperatures. Fortunately, in a properly constructed compost pile, these bacteria usually generate enough heat to support other species of bacteria that prefer warmer temperatures. The most rapidly decomposing bacteria work between 100 and 160 degrees F. At 160 degrees F these rapid decomposers are happiest and the decomposition process is at its fastest. These microbes require very little from you. In fact, they only ask for two things: food and oxygen.
Aerating your compost pile
The ingredients you add to your compost pile provide plenty of food for these microbes, but they also need oxygen. The decomposition of a compost pile is an aerobic process, meaning the microbes inhale oxygen and exhale carbon dioxide while decomposing. To maintain aerobic conditions, oxygen must be provided by turning or otherwise aerating the pile on a regular basis (ideally, at least once a week).
If the pile is not turned and no oxygen is present, your compost pile’s decomposition switches to fermentation. Different organisms are at work during fermentation, and they release both methane and ammonia, and as a result, your pile will stink. In addition, fermenting piles don’t generate enough heat to kill pathogens or weed seeds, creating more than one potential problem. Decomposition does not smell bad when adequate oxygen is present. A good, science-based compost how to guide will always tell you to turn your pile.

Good compost is hot… until it’s not
The process of decomposition naturally creates heat, so properly constructed compost piles are hot to the touch and should reach up to 160 degrees F. Sustaining this temperature for 10-15 days is enough to kill most human and plant pathogens, as well as most seeds. If you want to make sure your pile gets hot enough, invest in a good compost thermometer and check the temperature daily.
One sign that a compost pile is done “cooking” and the contents are ready to spread on the garden, is a drop in the pile’s temperature. Finished compost will not be hot.
The amount of time it takes for a compost pile to finish decomposing depends on several factors, including the particle size and C:N ratio of the ingredients, the moisture content of the pile, and how often the pile was aerated. You can get finished compost in as little as four weeks, if you pay attention to all of the factors discussed in this compost how to guide.
A word on pile-it-up-and-wait composting
Before you tell me that you’ve always gotten wonderful compost by simply dumping whatever ingredients you have in a pile somewhere, I should let you know that this pile-it-up-and-wait method is technically called “cold” or “slow” composting. Since all organic materials will eventually decompose, it’s a legitimate way to compost, and it’s part of many a compost how to guide. However, though the finished compost may be dark and crumbly, the C:N ratio is probably not ideal. And, extreme caution should be used when “cold” composting with animal manures as these piles don’t get hot enough to kill human pathogens, including E. coli, nor do they get hot enough to kill most plant pathogens and weed seeds.
If you don’t have enough room for an outdoor compost bin but still want to keep food scraps out of the landfill, check out our article on indoor, small-space Bokashi composting.
For more on making great soil, please visit the following articles:
- Feeding your soil: 12 creative ways to use autumn leaves
- How to build a worm bin
- Building a DIY compost bin
- Bokashi composting indoors
- Soil amendments for the garden
We’d love to hear about your composting process. Tell us about it in the comment section below.
Any tips on heating up the pile? I tried to watch my ratio as best I could but my pile is still cold. Defintely decomposing but taking a really long time. I’m afraid to add greens because a lot of the pile is already broken down. Thanks! Really great article.
If your pile isn’t “cooking”, turn it and add more nitrogen-rich materials (like grass clippings or feather meal). That will introduce nitrogen to the pile and the turning action introduces oxygen to stimulate the microbes.
How do I know that my combination of 30:1 is ok
Without a lab analysis, it’s difficult to tell the exact C:N ration of finished compost. Because of this, home gardeners should focus on maintaining a good balance of ingredients going into the pile. If you add the ingredients in the target ratio of brown to green, the finished compost has the best chance of having a C:N ratio closest to 30:1.
Thanks for the info. My neighbor just had a very large oak tree removed from her yard. The trimmers mulched it and we have saved a pile. There is the wood pieces and leaves it in. I have read that in this fresh state it isn’t best for the garden as a mulch. My question is could I dry it out and use it as the brown materials in the compost later and also use it now as the green?
Yes you could do that. Great idea!
Great article!! I have been wanting to get into composting for sometime but have been unsure about the process.
What do people do if they don’t have enough brown matter vs green? I would have green from grass trimmings, but don’t really have plants that produce a lot of brown, dead leaves and twigs. I could probably use cardboard and newspaper but assumed that was just to supplement the brown would it be ok if that majority of of the brown material?
Also when shredding the material what kind of size are we looking for and how do people go about actually shredding it?
You can use shredded newspaper and cardboard without a problem. I would shred into fine strips, if possible, but larger chunks will decompose, too, it will just take them longer. I also save bags of fall leaves from myself and the neighbor and leave them next to the compost pile for the winter. Then when I need them the following season, I just take them out of the bags and toss them into the pile as needed. A bale of straw would perform the same function.
A first class article , we ALL need to compost as much as possible , unfortunately I am the only one in my road that does it , everyone sends everything to landfill !!
Thanks, Andy. And keep up the good work! Maybe you’ll inspire your neighbors.
Thanks. Does the “ideal” bin need to be more enclosed (all the way around, with a top) to help with heat, or is something 3 sided, no top OK (obviously easier to turn)? Also do the rotating bins serve the purpose of turning the compost?
Hi. You don’t need a top for your bin, no. But one is nice to have if you have raccoons and opossums who like to get into the pile and scrounge for kitchen scraps. And yes, rotating bins make turning the piles easier. You can just flip the ingredients in one bin over to the next bin when it’s time to do a big turn. Plus, that way you aren’t adding new scraps to an existing bin that’s already “cooking”; instead you’re always adding new scraps to the end bin.
Thank you for taking your time to explain how to compost. Your article is exactly what I needed and answered all of my questions and has me on track to take advantage of my kitchen and yard scraps. Thank you again.
Hi, thanks for the article. All the information is very helpful. I have a couple of questions for you. After making the compost pile for the first time, how often do I add new material? Do I keep adding keeping the C:N ratio? Adding some soil with earthworms in the compost bin would help? Thanks a lot in advance!
Adding soil to your pile to “inoculate” it with microbes would help, but isn’t necessary. And since compost piles heat up, worms don’t like to be in them until they’re in the very late stage of decomposition. It’s really the microscopic life that works to break down the pile; they can handle the heat. If you have the space, I would recommend starting a second pile to add new materials to and just let the first pile actively decompose without any new additions.
Hi i’m just starting this composting and i’m getting confused with peoples different versions, one says more Greens than Brown, then other people say more Brown than Green which one is the right one? and could you tell me how many of my containers to use for each please?
I’m using a 10L container of veg scraps, peelings and coffee grounds, and a 10L of shredded paper, cardboard, newspaper, brown leaves.
Thank You.
Barry (ENG)
Hi Barry –
We agree that there’s lots of mis-information out there about proper composting technique. However, the information found in this article is accurate and up-to-date with the current science on composting. In it, you’ll find all the answers to your questions. Happy composting!
To add carbon, I shred all my boxboard (cereal boxes, etc.) into small pieces and throw them in the countertop green bin with kitchen scraps. Eventually this goes to the composter and gets covered with a layer of dry leaves, but I don’t need so much.