
This post may contain affiliate links. If you make a purchase through links on our site, we may earn a commission.
Growing plants from leaf cuttings sometimes feels like magic—snip a single leaf from a favorite houseplant, tuck it into a pot, and a few weeks later tiny new plants appear. Yet this is exactly how many popular plants multiply, from African violets and jade plants to snake plants and rex begonias. In this guide, we’ll look at why leaf cuttings are worth trying, the main types, the materials you need, step-by-step instructions for four methods, and how to care for your cuttings until they are ready for pots of their own.

Why propagate plants from leaf cuttings
Leaf propagation is inexpensive, requires very little equipment, and lets you turn one plant into dozens of identical copies to keep or share with friends. The trick is knowing which plants are the best ones to use and matching the right method to the right plant.
Leaf cuttings are one of the most economical ways to expand your plant collection. A single healthy leaf can produce several new plants, and the mother plant barely notices the loss. Because the new plants grow from the mother plant’s own tissue, rather than from seeds, they are clones, so you can reliably reproduce a favorite flower color, leaf pattern, or growth habit. (Variegated plants are the exception. Some variegated types, such as certain snake plants, often produce plain green offspring from leaf cuttings.)
Leaf propagation is also the best option for plants with very compact stems, like African violets and echeverias, where there is simply no stem available for rooting a stem cutting.

Main types of leaf cuttings
Not every plant can be propagated the same way when using leaf cuttings, and the exact method to use depends on how each different plant responds (i.e. which tissue it relies on to generate new root and shoot growth). There are generally four approaches to taking leaf cuttings.
- Whole leaf cuttings use an entire leaf, with or without its stalk (aka petiole). African violets, gloxinias, and peperomias are rooted this way. In addition, many succulents such as jade, echeveria, sedums, and kalanchoe are also easily propagated via whole leaf cuttings.
- Leaf petiole cuttings are a variation in which the leaf stalk is buried in the rooting medium or placed in water. New plantlets form at the bottom end of the stalk. This is the classic method for African violets and many peperomias.
- Leaf vein cuttings rely on the veins of the leaf. Rex begonias are the star here: you wound the main veins and lay the leaf flat on a pot of growing medium, and new plants appear at each cut. I also love to propagate cape primrose plants this way using the main central vein of the leaf (see photos in section below).
- Leaf section cuttings involve dividing a leaf into pieces. Snake plant leaves, for instance, are cut into two-inch sections and planted upright, with the lower end down. New plantlets form at the base of the cutting.
You’ll find step-by-step instructions for each of these methods below.

Materials for leaf propagation
The good news is that you need very little to get started. Gather your supplies before you take a single cutting so the leaves don’t dry out while you work.
- A sharp, clean blade. Use a razor blade, propagation knife/scalpel, or sharp scissors, and wipe it with rubbing alcohol to prevent spreading disease.
- A well-draining rooting medium. Perlite, vermiculite, coarse sand, or a seed-starting mix lightened with perlite all work. Succulents prefer a gritty cactus mix. Leaf petiole propagation can also take place in water.
- Small pots or propagation trays with drainage holes. Standing water around a cutting is the quickest route to rot.
- A humidity cover. A clear plastic bag, clear propagator lid, or another inverted clear container keeps moisture high around the cuttings as they root.
- Rooting hormone (optional). It can speed things up for stubborn plants, though easy species like African violets and echeveria usually root without it.
Finally, choose a bright spot out of direct sun and, ideally, a warm room around 65 to 75°F (18 to 24°C). Warmth encourages rooting, while hot, direct sunlight will scorch cuttings that have not yet rooted.

How to take whole leaf cuttings
Whole leaf cuttings are the simplest place to begin, especially with succulents. Choose a healthy, fully grown leaf that is free of damage, pests, and disease.
For succulents such as echeveria, jade, and sedum, gently twist the leaf sideways away from the stem so it comes off cleanly with its base intact. A leaf that tears and leaves a piece behind is unlikely to root. Set the leaves on a dry tray for one to three days, depending on their size, until the cut end forms a dry callus. This protective seal helps prevent rot once the leaf touches the soil.

Fill a tray with gritty cactus mix or vermiculite and lay the calloused leaves on the surface, or press the base just slightly in. Do not bury them. Place the tray in bright, indirect light and mist lightly only when the surface is completely dry. Within a few weeks, tiny roots will appear, followed by the miniature rosette of a new baby plant at the base of the leaf. Eventually, the parent leaf will rot away.

How to take leaf petiole cuttings
This method works beautifully for African violets, gloxinias, and many peperomias and begonias. Choose a healthy, mature leaf from the middle of the plant rather than a very old outer leaf or a tiny new one.
Using a clean blade, cut the leaf and its petiole off of the mother plant. Some growers trim the cut at a slight angle to expose more tissue for rooting. Fill a small pot with a light, moist mix of perlite and peat or plain vermiculite. Dip the base of the petiole in rooting hormone. Poke a hole with a pencil and insert the petiole at a shallow angle so the leaf blade sits just above the surface without touching the mix. Firm the medium gently around the stalk. You can also propagate these leaves in a jar of water.

Water lightly, let any excess drain away, and cover the pot with a clear bag or humidity dome. Place it in bright, indirect light. Roots usually form in three to four weeks, and tiny plantlets should appear at the base of the stalk in six to eight weeks. The original leaf will gradually yellow and shrivel as the new plants take over. Several plantlets may form from one leaf.

How to take leaf vein cuttings
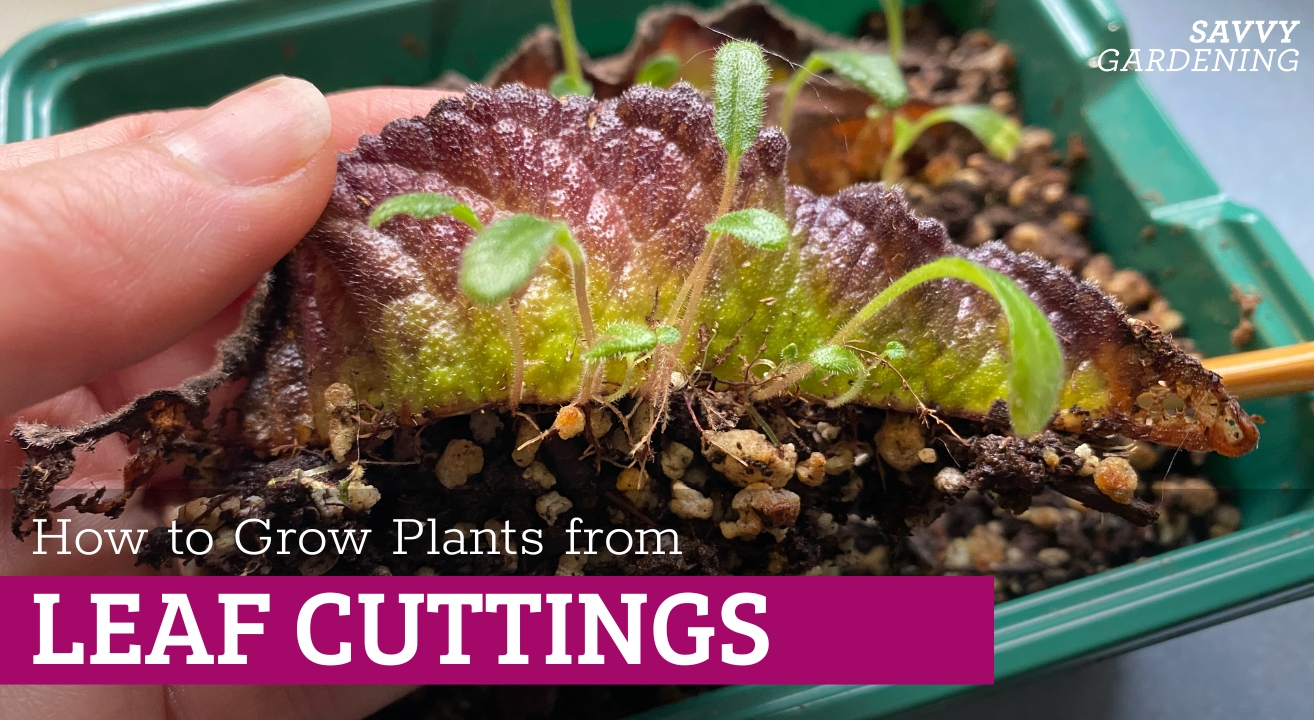
Leaf vein cuttings are ideal for rex begonias and other begonias with prominent veins as well as for cape primroses (shown in the photos). The principle is simple: new plants grow from the points where the main veins are wounded. Select a large, healthy, fully grown leaf and remove it, trimming off the petiole completely.

For begonias, turn the leaf upside down on a clean surface and, using a sharp blade, make small cuts across the main veins on the underside. Cut each major vein in several places, roughly an inch apart, but do not cut all the way through the leaf. Dust the locations of the cuts with rooting hormone. Fill a tray with moist, free-draining mix and lay the leaf right side up, cut side down, firmly on the surface. Use small pebbles, toothpicks, or bent wire pins to hold it flat, because good contact between the veins and the medium is essential.
For cape primroses, cut a single leaf in half lengthwise, down the whole length of the central leaf vein. Dust the cut vein in rooting hormone. Nestle both halves of the leaf down into the medium so the cut vein is slightly buried.
Cover the tray and keep it warm in bright, indirect light. Over several weeks, roots and tiny plantlets will form at each cut. For cape primroses, numerous young plants will form all along the length of the vein.

How to take a leaf section cutting
Leaf section cuttings suit plants with long, sturdy leaves, such as snake plants. Choose a healthy, mature leaf and cut it off at the base with a clean, sharp blade. Slice the leaf crosswise into sections about two inches long. Make the bottom cut slanted and the top cut straight, or mark the top of each piece, so you remember which end is up.
Orientation matters. Only the end that pointed toward the roots will grow new roots, so a section planted upside down will not develop. Let the pieces dry for a day or two until the cut edges form a callus, which helps prevent rot.
Fill a pot with a gritty, free-draining mix and insert each section upright, with the slanted end buried about an inch deep. Firm the mix gently around it. Water sparingly, then keep the pot in bright, indirect light. Roots can take several weeks to appear, and new shoots may take two months or longer, so be patient.

Caring for your cuttings as they root
Once your cuttings are in place, your job is to give them steady, gentle conditions and then to be patient. Rooting usually takes several weeks, and some plants, such as snake plants, can take two months or more.
- Light: Provide bright, indirect light. A windowsill with a sheer curtain or a spot under a grow light works well. Direct sun will cook cuttings under a plastic cover.
- Moisture: Keep the medium lightly moist but never soggy. Succulent leaves need much drier conditions and should only be misted occasionally. Overwatering is the most common reason leaf cuttings fail.
- Humidity and air: Tender plants like African violets and begonias appreciate a humidity cover, but lift it for a few minutes every few days to let fresh air in and discourage mold. Skip the cover for succulents.
- Warmth: Aim for about 65 to 75°F (18 to 24°C). Cool conditions slow development considerably.

What to do after the cuttings root
When plantlets appear, resist the urge to rush them. Let them grow until they have a few small leaves of their own and a visible root system, which can take a few more weeks. At that stage, gradually remove the humidity cover over several days so the young plants can adjust to normal room air.
To separate them, gently lift the whole cutting from the medium, taking care not to damage the tender roots. Tease apart the plantlets, keeping some roots attached to each one. Pot each baby into a small container with drainage holes, using a fresh, light mix suited to the species. African violets prefer a peat-based mix, while succulents need a gritty cactus blend.

Water the new pots lightly and keep them in bright, indirect light for the first couple of weeks. Hold off on fertilizer until you see fresh, active growth, then use a diluted, balanced houseplant fertilizer. Move plants up to larger pots as they grow.

Propagation magic
Growing plants from leaf cuttings is one of the most rewarding and budget-friendly skills a gardener can learn. Choose a suitable plant, match it to the right method, provide warmth, bright indirect light, and appropriate watering, and then give it time. Not every cutting will succeed, so take several more cuttings than you think you need. If you’re lucky, you’ll have plenty of new plants to share.
You’ll find plant more plant propagation advice in these articles:

Leave a Reply