This post may contain affiliate links. If you make a purchase through links on our site, we may earn a commission.
Straw bale gardening is HUGE! And for good reason as it’s an easy way to grow vegetables and flowers in small spaces, driveways, or any area where it’s hard to dig a new garden. A straw bale is a self-contained garden where the centre of the bale is seasoned with fertilizers to start the decomposition process and create a rich pocket for plants. Read on to learn more about gardening in straw bales.

Straw bale gardening has been popularized in recent years by Joel Karsten, the author of Straw Bale Gardens, which details everything you need to know to get started growing in straw bales. I think many people have embraced this technique because it’s so easy to do, straw is widely available, and it allows you to grow food in small spaces or less-than-ideal sites.
Straw versus hay
I’m often asked about the difference between straw and hay and which material is the best to use in a vegetable garden. Straw bales are comprised of the stems of grains like wheat and barley. They’re often used as bedding for animals and gardeners use straw for mulching, composting, or straw bale gardening. Hay bales are made up the entire plant and therefore contain seed heads. They’re used as feed for sheep, cows, and horses. Gardeners generally avoid hay as they don’t want to introduce weedy seeds into their garden beds.

Benefits of straw bale gardening
While I enjoy growing vegetables in a handful of straw bales at the back of my food garden, they aren’t a replacement for my raised beds. They are, however, a great way to get more out of my space. Here are 5 benefits to planting in straw bales:
- Fewer weeds – While straw bales may sprout a few grassy weeds, they don’t contain common garden weeds like lambs-quarters, dandelions, pigweed, and purslane. Therefore you won’t spend the summer battling these aggressive weeds.
- It’s a cheap way to start a garden – Straw bales can run from $5 to $15 each in my area. I try to buy them in autumn, when they’re easier and cheaper to source. It also pays to buy them from a farmer, not a garden centre, where they are typically less expensive.
- No need to build a raised bed – I love my raised beds, but each one is a DIY project that requires time, tools, and money. If you’re renting or not sure you want to commit to a permanent raised bed, planting a straw bale garden is a great way to grow food quickly.
- Plant anywhere! – Do you have poor, rocky soil that is super hard to work? Make a straw bale garden. Is your only sunny spot a driveway or paved area? Make a straw bale garden. No time to dig up an area for an in-ground garden? Make a straw bale garden!
- Compost materials – At the end of the season, the spent straw from the half-rotted bales can be turned into compost.

Types of straw bale gardens
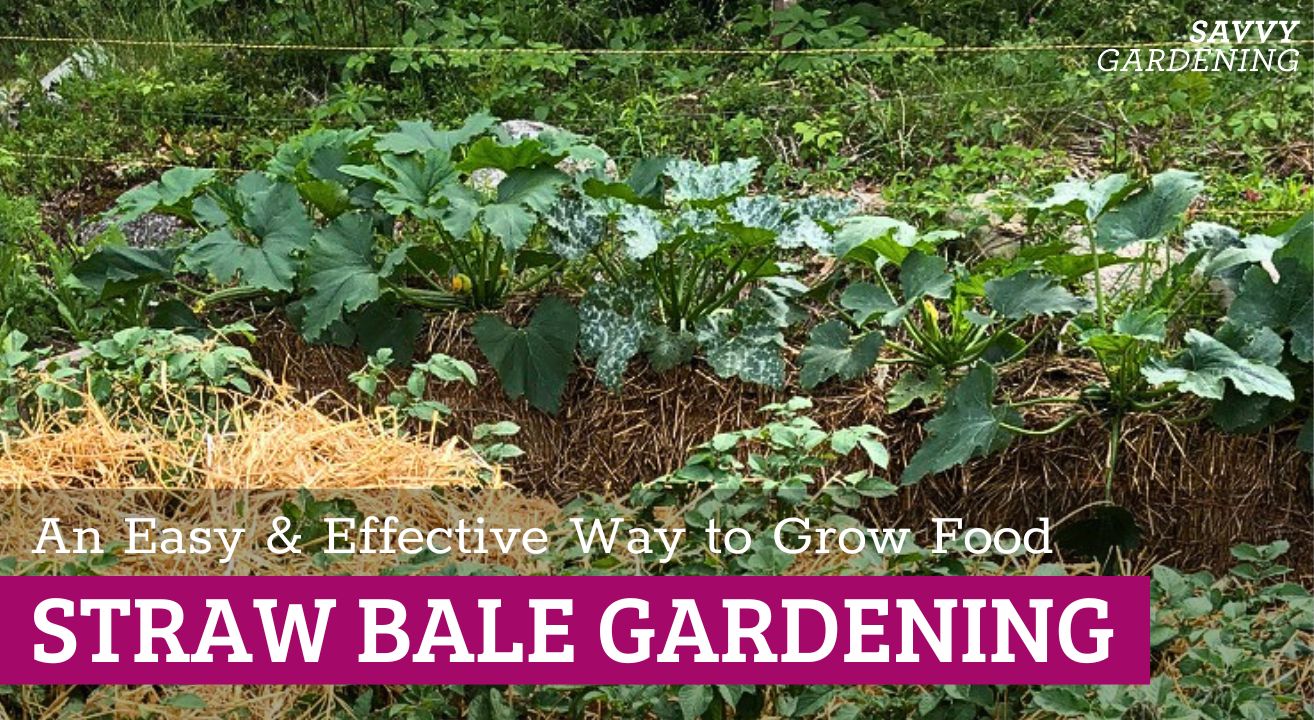
While most straw bale gardens are made from whole, stringed straw bales, I also make free-formed straw bale beds to grow vegetables like squash, pumpkins, cucumbers, burr gherkins, melons, and gourds.
- Stringed straw bales – This is the type of straw bale garden you see in books, magazines, and websites. The rectangular straw bales are held together with a string material, usually plastic twine.
- Free-formed straw bale beds – I like to call this deconstructed straw bale gardening as I typically make these beds from old, half rotted straw bales or the straw that was used for mulching the season before. They’re super easy to make and create a nutrient-rich bed for growing vegetables. I layer straw with rotted manure or compost so that there are two to three layers of each. I also add some slow-release organic fertilizer as I create the layers to ensure a rich mix.
Sourcing straw bales
Depending where you live, it can be hard to source straw bales. In my area, the cost per bale ranges from $5 to $15. The low range is when I purchase them directly from a farmer. The higher cost comes from buying straw bales at garden centres. I also buy my bales in fall, not spring. Why? They’re easier to source in the fall and the price is generally lower. I store fresh, dry bales at the back of my polytunnel, in my shed, or under a sheet of plastic. This prevents them from getting wet and waterlogged over the winter.
NOTE: When buying straw bales, be sure to ask if the straw was treated with an herbicide. Avoid any treated bales as they can’t be used to grow a straw bale garden and they can contaminate your garden soil or compost pile.

Where to put a straw bale garden
When growing vegetables, site selection is very important. Most vegetable crops need at least eight hours of direct sunlight each day, especially those which produce fruits; tomatoes, squash, cucumbers, and peppers.
Keep in mind that a straw bale holds a lot of water and it’s very heavy and awkward, if not impossible to move. So be sure your chosen location can host your straw bale garden for the entire season.
The beauty of straw bale gardening is that you can create a garden where it would be difficult to plant in-ground or even with a raised bed. Before putting the bales down, you can lay newspaper, cardboard, landscape fabric, or other materials underneath the bales to prevent weeds. My base is bark mulch so I don’t bother but if your site is very weedy, this is a good idea.
Conditioning a straw bale for gardening
Once you’ve planned the design of your straw bale garden and gathered the bales, it’s time to start the conditioning process. You can’t plant directly into fresh, unconditioned bales as they don’t offer the organic matter and nutrients that vegetable seedlings need to grow.
This process takes about two weeks, so plan accordingly and begin conditioning a few weeks before you intend to plant. Here are 4 steps to conditioning straw bales:
- Position the bales. Place bales so the narrow side with the visible cut straw edges is facing up. The hollow stems of the cut side help water (and the fertilizer during the conditioning process) saturate the entire bale. Also, don’t remove the strings. They help the straw bale keep its shape as it decomposes.
- Apply two to three cups of organic fertilizer to the top of each bale every two days. I typically use what I have on hand which, this spring, was a bag of blood meal (high in N) and a general vegetable fertilizer. I sprinkle the fertilizer on and then water deeply to help the fertilizer work down into the bale.
- Every second day – the day you don’t fertilize – water each bale deeply. I like to take my garden fork to help loosen the tightly packed straw and allow the fertilizer work its way down into the bale.
- After about 10 days, you’ll notice the tops of the bales are beginning to break down. If you stick your hand into the bale – this is the cool bit – you’ll likely feel that it’s warm inside thanks to the composting process. At this point, I put two last cups of fertilizer on each bale and water thoroughly.

What kind of fertilizer to use in straw bale gardening
I use an organic fertilizer that is high in nitrogen. Avoid slow release fertilizers because you want the nitrogen to be readily available to jump-start the decomposition process. I use blood meal, but you could use other high nitrogen fertilizers like alfalfa meal, feather meal, or an organic lawn food.
Straw bale gardening instructions
Straw bale gardening is really easy. To sum it up, start by sourcing straw bales, then season them, plant with seedlings or seeds, and water and fertilizer throughout the summer. At the end of the season, you’ll have plenty of organic material to toss in your compost pile.
To really take your straw bale garden to the next level, consider adding vertical supports like trellises, tunnels, or stakes. Secure these to the ground; don’t just insert them in the straw bale. This is because the bale rots as the season progresses. You can use strong metal, wood or fibreglass stakes, or various A-frame trellises to provide ample support to vining or vertical crops.
Once the trellises or supports are in place, plant indeterminate tomatoes, squash, pumpkins, melons, cucumbers, pole beans, and other climbing vegetables to scale the vertical structures.

Care & maintenance
Once your straw bale garden is planted, most of the work is done, but you still need provide consistent moisture and fertilize. I like to water with a watering wand as it allows me to direct water at the base of the plants and the surface of the straw bale. Splashing water from a sprinkler can encourage the spread of common vegetable diseases so I avoid overhead watering. Alternatively, you can also run drip irrigation or soaker hoses at the top of the bales to provide a deep, regular watering.
You may have used a lot of fertilizer to season your straw bales but I still supplement that with a dose of a liquid organic feed every two to three weeks once the bales are planted. I like using fish emulsion or liquid kelp in my watering can to give the plants a boost. And while you can expect fewer soil borne disease issues growing in straw bales you still need to keep an eye out for pests and disease issues like powdery mildew, squash bugs, and cucumber beetles.

Best plants for straw bale gardening
You can grow practically any vegetable, as well as herbs and strawberries in a straw bale, but some are easier to grow than others. Here are a few tips on picking the best plants for a straw bale garden:
- I like to use straw bales to grow space hogging, nutrient-loving veggies like zucchini, pumpkins, gourds, and cucumbers. I have the perfect spot at the end of my raised bed vegetable garden where their vigorous vines can go crazy. Plus, they love the rich growing medium inside the composting straw bales.
- If you wish to direct seed, I recommend adding a several inch deep layer of soil to the top surface of seasoned straw bales. You can then direct seed vegetables like beans, peas, squash, lettuce, kale, or cucumbers. For most crops, I prefer to transplant as it’s quicker and less work.
- While squash and pumpkins love straw bales, so do heat-loving vegetables like tomatoes, peppers, and eggplants. Transplant these crops when the risk of frost has passed in late spring.
- Tuck seed potatoes or sweet potato slips in little holes dug out from the top of the straw bales.
- I generally don’t plant root crops in straw bales as they grow far better in my raised beds. If you wish to plant root crops like carrots, beets, or radishes, top your straw bale with a few inches of soil and direct seed.
Straw bale gardening problems
While there are many advantages to straw bale gardening, I have encountered a few drawbacks and issues.
- It’s a garden that only lasts one year. This is because straw bales collapse and decompose after months of use. They can’t be used for a second season. However, in year two, you can recycle the half rotted straw into a free-formed garden bed.
- You need a lot of fertilizer to season the bales for planting. I know some gardeners use inorganic, herbicide-free lawn fertilizers to season their straw bales. You can buy a large bag fairly cheap, but as an organic gardener I prefer to use an organic product.
- Straw bales are big sponges and you’ll need to water frequently in dry weather.
- Slugs are a nuisance in my garden, but particularly in my straw bale beds in late spring. They love cool, damp weather. I hand pick every day and use a layer of diatomaceous earth around each plant to reduce damage.

Straw bale gardening in winter
This is a fun project for those who have structures like greenhouse, polytunnels, or even geodesic domes. I store straw bales in my polytunnel during winter so I can use them in spring for mulching and straw bale gardening. But, I’ve also used them to grow cold hardy greens like kale, spinach, Asian greens, and arugula for winter harvesting.
For mature kale plants, place the bales in your structure in mid-summer and begin the seasoning process. Once they’re ready to plant, tuck four kale plants in each bale. By the time the cold weather arrives a few months later, your kale will be mature and you can harvest leaves for salads and kale chips from December until March.
For more information on growing food with straw or even shredded leaves, be sure to check out these articles below:
- Growing potatoes in straw
- How to mulch with straw
- A simple winter mulch equals a bumper crop of cold season veggies
- From potato bins to squash rings, how to use leaves in the garden
Are you a straw bale gardener?
Straw bale gardening looks like a great option after my experience last year with a huge heirloom tomato that took over one of my raised beds! Our big issue is gophers. Have you seen any sort of invasion by them in your hay bale gardens?
Help!! I mistakenly put too much fertilizer on my bales Due to the fact that my usual fertilizer was not available due to supply chain problems. Is there something I can do to calm the process down? I tried to plant a few seedlings but they died within 48 hours. Any suggestions?
Hi Elizabeth, I would flush the bales out with water – daily for the next week or so. Then try planting again. If you still get the same results, keep flushing with water and perhaps hold off planting for a few weeks. Hope that helps!! Niki
I cant read my book, I got it today and downloadeditbut the script is all running together and overlapping in places 😔
Which book Kerrie? The one by Craig LeHoullier? If so, contact the publisher Storey Publishing – via email or on social media to ask. I’m sure they can fix it.
I have been conditioning my bales for two weeks and they have not yet heated up. I do have wheat seed sprouting. Do they have to heat first or do I need to start over?
Hi John, I’m wondering where you are located… if the temps are quite cold, it takes longer for the bales to season. Sprouting is normal but often happens more with hay bales as they typically contain more seeds. I wouldn’t worry about the sprouts, they won’t affect your straw bale garden. If the weather has been cool, give them a couple more days of seasoning and then give them a bit of time. You can also remove a few inches of straw from the top, add some compost and plant directly in that. The work you’ve already done to season them will continue to break down the interior of the straw bales. Good luck! Niki
My first time trying straw bale gardening. I have been conditioning them as recommended, however the blood meal package states not to be used with peas, beans or legumes. What are your thoughts?
Thanks so much!
Hi Nikki,
I accidentally used a slow release fertilizer for the first 2 applications on my straw bales. Is this saveable, or should I put another layer of bales on top and try again?
First timer,
Colleen
Hi Colleen, no worries! I use a slow release granular fertilizer too for the seasoning process – blood meal, or a complete organic fertilizer. Just be sure to water the bales daily. That will help speed up the release of the nutrients. It may take a week longer to season but you’ll still be able to plant 🙂
Niki
Can I keep the bottoms of my hat bails wrapped in plastic to help hold the shape?
Hi Lisa, You could leave some plastic on the bottom but I would definitely poke holes for drainage. Otherwise water will pool in the plastic and can oversaturate the bale affecting the veggies. Good luck! 🙂 Niki
My wheat straw bails are sprouting about 3 types of mushrooms along with veggies. i pull them out and they return. will this contaminate my veggies?
That happens and is just part of the decomposition process… I don’t worry about mushrooms at all. I wouldn’t pick them to eat of course!! But they can be left or pulled out and composted. – Niki
This year is my first foray into straw bale gardening. I’ve planted a sugar pumpkin and a zucchini. How much fish emulsion do you use when you fertilize? Thanks for the great article
Great question! But I would recommend following the directions on your fish emulsion bottle. Each one seems to be slightly different and you don’t want to over fertilize. 🙂 – Niki
Read on label how much per plant .