This post may contain affiliate links. If you make a purchase through links on our site, we may earn a commission.
Are you wondering how to mulch with straw? Using an organic mulch in the garden is an easy way to reduce weeds and how often you need to water. Plus, straw is inexpensive, widely available, and enriches the soil as it breaks down. However it’s important to make sure you’re using the right amount of straw and applying it at the best time. Below I cover all the basics of how to mulch with straw and offer tips to ensure your success. Read on to learn how to put straw mulch to work in your garden.

Why it’s important to know how to mulch with straw
Using straw mulch in my vegetable garden is key to reducing my workload and creating a lower maintenance space. Knowing how to mulch with straw, also called garden straw, ensures that you’re getting the benefits of mulching without wasting time, materials, and money. As well, it’s important to apply the right amount of straw so your plants can thrive. Too much can impact sun exposure and reduce air circulation around seedlings. Too little won’t block weed seed germination or help the soil retain moisture.
There are many types of organic and inorganic garden mulches. Organic materials often used for mulching include pine needles, also called pine straw, shredded leaves, rice hulls, wood chips, and bark mulch. However wood chips and bark mulch are typically used in ornamental gardens, not vegetable beds. In food gardens straw or shredded leaves are very popular, effective, and easy to source.
5 Benefits of mulching with straw
Straw is my go-to mulch and for good reason. It’s inexpensive, available locally, reduces weed growth, holds soil moisture (less watering!), regulates soil temperature, and keeps the garden looking tidy. Garden mulching reduces the occurrence of soil-borne diseases and can discourage pests, like flea beetles, that lay their eggs on the soil surface. Mulching isn’t difficult to do and it doesn’t take long to apply a layer of mulch to the garden.

Straw mulch versus hay
It’s important to make sure you buy straw bales, not hay bales. They may look similar, but it’s straw that’s best in the garden. Straw, a post-harvest product, is made up of the dry hollow stems and stalks of grains like wheat, oats, or barley. It’s used for animal bedding or as a mulch in the vegetable garden. You can also use it to keep garden paths clean and mud-free.
Hay bales, on the other hand, are a combination of grass plants and alfalfa. They’re used as animal feed and usually contain seed heads, and potentially weed seeds. Hay bales are also more likely to be sprayed with herbicides which is incredibly damaging in a home garden. I only buy straw bales and I always ask garden centres or farmers if the bales are spray-free. Learn more about the differences between straw and hay.
Straw bale sizes
Straw bales come in various sizes but most garden centres offer two options. These are two and three string bales. Two string bales are secured with two lengths of twine and measure 18 inches by 36 inches by 14 inches. Three string bales are secured by 3 lengths of twine and measure 24 inches by 48 inches by 16 inches.
I also want to offer some advice on sourcing straw bales. I buy my bales from a local farmer who practices organic techniques. That means I can get spray-free bales. You’ll also find bales in late summer and autumn at garden centres, farm supply stores, and nurseries. Because straw is readily available late in the season I buy bales in autumn and store them in my garden shed or greenhouse for spring. If you leave bales uncovered outdoors they will start to discolor and break down. That’s fine if you want to try straw bale gardening, but half rotted straw isn’t ideal as a garden mulch. For this reason I keep them inside for the winter or until I’m ready to mulch. You could also cover them with a tarp or piece of plastic.

When to mulch with straw
To be most effective you’ll want to apply mulch at the right time. This depends on the planting technique, time of year, and weather. Let’s start with planting technique. Vegetables like tomatoes and peppers, which are planted as seedlings and not direct seeded, are mulched immediately after planting. This reduces the risk of soil-borne diseases like early blight. Direct sown crops, like bush beans, carrots, and lettuce, are mulched with straw once the seeds have germinated and the plants are a few inches tall.
The time of year also impacts timing. For example, I don’t apply mulch too early in the spring when the soil is still very wet. Therefore early planted crops like peas and onions aren’t mulched until the soil has dried out a bit and is no longer saturated. Mulch also shouldn’t be applied when the soil is very dry. I usually wait until we’ve had a good rain and apply straw to the beds a day or two after that.
Another consideration to keep in mind when learning when and how to mulch with straw is minimizing weeds. Once you’ve weeded a garden bed, pathway, or other area, apply straw mulch. This reduces future weed growth saving you time and frustration. I also spread straw on my garden pathways in spring to keep them weed-free for the growing season.

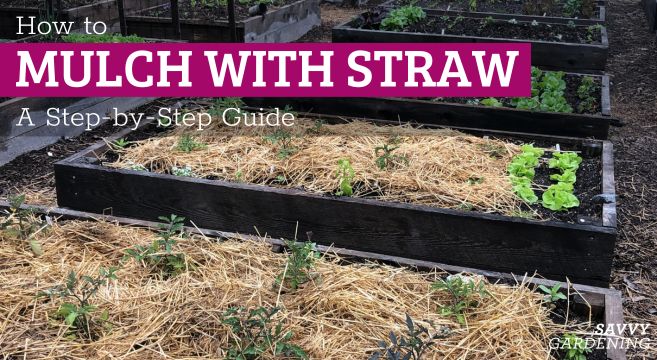
Garden beds: How to mulch with straw
It’s quick and easy to mulch vegetable garden beds. Here’s how I do it.
- Step 1: Remove weeds – While straw mulch prevents weed seed germination it won’t kill existing weeds. These must be removed prior to mulching or they will eventually emerge through the loose materials. I use a long handled tool like a collinear hoe, stirrup hoe, or wire hoe for weeding.
- Step 2: Water if the soil is dry – One of the benefits of mulching is that it holds soil moisture and slows evaporation. That means you won’t have to get out your hose so often. If you haven’t had rain recently it’s a good ideal to deep water the garden bed before applying the straw mulch. This is also a good time to run soaker hoses if you wish to take a hands-off approach to irrigation. I lay soaker hoses on the soil surface of my polytunnel before I add the mulch. Then I just need to turn on the outside tap for 30 minutes to deep water the bed. So easy!
- Step 3: Spread the mulch on the soil surface – Spreading mulch is a bit of a messy job, especially on a windy day. I put on garden gloves and spread the mulch in an even layer around my vegetable plants. Don’t cover the plants completely. And be sure to leave a couple of inches of space around each plant. Mounding mulch up against the stems can promote rot. Also don’t pack down the mulch. It should be loose and fluffy to allow water and air to pass through.

Garden pathways: How to mulch with straw
I mulch the space between my garden beds with straw or bark mulch to reduce weeds. It saves me many hours of weeding and only takes a few minutes to do.
- Step 1: Remove weeds – Again you’ll need to remove existing weeds before you lay down the mulch. For pathways I find a stirrup hoe makes quick work of eliminating unwanted plants.
- Step 2: Lay down newspaper or cardboard – I don’t add a layer of newspaper or cardboard when I mulch vegetable beds as it can impede moisture, but it’s useful with pathways. It’s another step to preventing weeds. I remove any bits of plastic or tape from the cardboard and lay them between my beds. Or use 3 to 4 sheets of newspaper beneath the mulch.
- Step 3: Spread the mulch on the soil surface – Top this bottom layer with 4 to 6 inches of straw or 2 to 3 inches of bark mulch. I use a garden fork or compost fork to apply the straw to pathways as it makes the work go by faster.

How much mulch do you need?
Straw is a very lightweight material and the amount you use depends on the application. Here are some examples of how much straw to apply in the garden.
- To mulch vegetables – Apply a 3 to 4 inch thick layer of straw mulch around your plants. At first it may look like too much, but it quickly settles with rain and irrigation.
- To mulch garden pathways – Using my garden fork or composting fork, I spread a 4 to 6 inch thick layer of straw in the pathways between my raised beds. To further reduce the risk of weeds growing in the paths, I lay newspaper or cardboard down first, covering that with the straw.
- For a winter mulch – As a year-round vegetable gardener I use a blanket of straw to insulate root vegetables like carrots, parsnips, and beets in winter. More on this below, but essentially I apply a 10 to 12 inch thick layer of straw on top of the beds in late autumn, before the ground freezes. I talk about winter harvesting in detail in my best-selling book The Year Round Vegetable Gardener.

More tips on how to mulch with straw
There are other ways you can put straw to work in your garden. I also use straw as a winter mulch, to grow potatoes in summer, and to establish grass seed.
- Using straw as a winter mulch – I insulate root vegetables as well as stem crops like leeks in winter with a thick layer of straw mulch. Apply the straw on top of or around plants in late autumn before the ground freezes. To keep the insulating layer of straw in place cover it with an old row cover.
- Growing potatoes – Planting potatoes in straw is an easy way to grow a lot of tubers. Start by amending the soil with rotted manure. Then press seed potatoes into the soil, spacing them about a foot apart. Cover them with 6 inches of straw. As the plants grow, add more straw until the layer is about 10 inches deep. At the end of the growing season harvest each potato plant and gather the tubers for storage or the kitchen.
- Establishing new grass – Straw mulch isn’t just used in vegetable gardens. It’s also beneficial when seeding a lawn or patching bare spots. After planting and watering the grass seed, spread a thin layer of straw on the soil surface. You don’t need much, just a scant one-quarter inch is enough. This reduces weed growth and helps the soil retain moisture so the seeds germinate quickly. It also prevents birds from gobbling up the seeds. There’s no need to remove this thin layer of straw. Once the grass is ready to be mowed, the lawn mower will chop it up to add nutrients and enrich the soil.

What to do with the straw at the end of the growing season
When learning how to mulch with straw, the last step is knowing what to do with the mulch at the end of the growing season. I typically tidy up my vegetable beds in late autumn, adding the spent vegetable plants to my compost pile. However, I leave the half-rotted straw on the soil surface to reduce winter erosion. Come spring this is removed and added to the compost bin to break down and eventually enrich my garden soil.
For more information on mulching be sure to check out these detailed articles:
- Mulch calculator: How much mulch do you need?
- Making and using leaf mulch in the garden
- The best types of mulch for your garden
- Hay versus straw
- Organic weed control: Tips for gardeners
Did I answer your questions about how to mulch with straw?

Hello Nikki,
Thank you for your guide on using straw in mulching. I have read about using straw as a top layer in sheet mulching–I am attempting to get rid of part of my lawn over the fall. I don’t know how many bales of straw to buy but I want to have a layer of around 6″ and would like to create at least two raised beds and two or three areas for shrubs. Maybe if I lay out the cardboard I have I can estimate the amount of straw needed. Any pearls of wisdom you can share would be welcome!
Thank you,
Tania CD
Hi Tania… nice you’re going to be renovating your yard and replacing lawn with garden beds. When I’m sheet mulching (using cardboard to smother grass and make planting areas), I usually cover it with compost not straw. It helps the cardboard break down quicker and you can plant in it sooner. If you are planting shrubs through cardboard covered with straw or mulch I would cut planting holes in the cardboard so the roots are planted to the proper depth. Good luck!! Niki