This post may contain affiliate links. If you make a purchase through links on our site, we may earn a commission.
Whether your plants produce pink, yellow, or orange flowers, knowing when to cut back daylilies can keep these perennials looking tidy and blooming well. Though each flower is only open for a single day, daylilies are a much-loved perennial around the world. In this article, you’ll learn about three different times to cut your daylily plants back to keep them in tip-top shape.

Signs that it may be time to prune your daylilies
Knowing when to cut back daylilies is easy if you know what signs to watch for. While pruning them back at the end of the growing season (after they’ve been killed by a frost) is a common practice that’s part of their general maintenance requirements, whether or not to prune daylilies at other times of the year is a lot more confusing for gardeners.
Signs that it’s time to prune your daylilies—regardless of what time of year it is—include:
- Yellow or brown leaves at the bottom of the plant
- Dead flower stalks, with or without seedpods
- Leaves with spots, splotches, or other signs of disease
Read on to learn why these signs indicate the need to prune and what to do about it.

Why trimming daylilies back is important
Daylily plants thrive in conditions from full sun to part shade. And in general, they require very little care. However, their green leaves can sometimes turn into yellow or even dead leaves as the season progresses, especially if the plants face stress from drought, disease, or pests.
Daylily leaves can even naturally turn ratty at the end of their bloom cycle. They put forth a lot of energy to produce their initial new growth followed by stems full of gorgeous blooms. By the time they’re done blooming, the plants are tired and low on fuel.
A well-timed haircut keeps daylily plants looking their best, and in some cases, it can even stimulate another flush of blooms. Keep reading to learn when to cut back daylilies.

The 3 best times to prune daylily plants
First, it’s important to mention that while there are ideal times to cut back daylilies based on the time of year and their bloom cycle, it’s also important to know that there really is no wrong time to trim daylilies. If the plants have turned brown and they look bad, don’t hesitate to give them a haircut and clean out any dead foliage, no matter what time of year it is.
If you want to keep your daylily plants looking their best, here are the three best times to prune them back.
1. When to cut back daylilies in spring
Early spring daylily pruning should take place if you did not cut back the plants last fall. The best time to do this is about 6 weeks before your last expected spring frost. Here in Pennsylvania, I cut back last year’s daylily growth in late-March if I didn’t get to it in the fall. I often do it the same time I cut back my Russian sage plants.
It’s important to cut the plants back to the ground before any flower bud development takes place and while the plants are still fully dormant. If they’ve already started to generate new growth, it’s still okay to cut the old growth back; you just have to be more careful not to damage the new emerging leaves.
You can use a sharp pair of pruners for the job, but most of the time, you’ll be able to remove last year’s growth just with your hands. Rake it out with your fingers and toss it on the compost pile.

2. When to cut back daylilies after bloom
The second time for a daylily haircut is in mid-summer, just after the plant finishes blooming. You can trim off individual spent blooms at any time to keep the plant tidy. Deadheading daylilies in this way is easy, but it isn’t essential. Many gardeners ignore this near-daily task and instead opt to wait to deadhead until the flower stalks have completely finished producing new blooms.
To do this, trim off all of the main flowering stems down at their base when there are no buds left to open. This stops the stem from producing a seed pod and helps the plant store energy for more plant and foliage growth, rather than using its energy to produce unwanted seeds.
Once the plant has been deadheaded, some reblooming varieties, such as ‘Stella d’Oro’ and ‘Happy Returns’, will even generate a second flush of flower stalks. However, most varieties of daylilies are not rebloomers and will flower only once during the growing season.

3. A mid-season buzzcut
Here’s the secret third pruning time for daylilies. It’s one that most gardeners fail to do because they don’t know how much it will invigorate their plants, and they may even be afraid to prune their daylilies back so hard. However, a mid-season buzzcut keeps daylilies looking fresh and green all the way through season’s end. Here’s what to do.
A few weeks after you’ve removed all the spent flowers, the plant is running low on food supply and is likely to look worn out. A good portion of the leaves will probably be brown or showing signs of disease. When this happens, it’s time to be ruthless. Cut the entire plant all the way back down to the ground, flush with the soil. It’s going to be scary, but trust me… everything will be fine.
Within a few weeks of completely cutting down your daylilies, they will leap forth with a flush of new growth that is fresh and green and lovely. These new leaves will now generate the food supply for next year’s flowers. The photosynthesis they perform from this point until the end of the season provides nutrition for roots and crown to get the plant safely through the winter. Trust me on this. Cut the plants back hard a few weeks after they finish blooming, and you’ll be so pleased with the result.

Should you cut back daylily plants at the end of the season?
When to cut back daylilies also involves a decision about what to do at season’s end. All that lovely new growth in late summer will eventually be killed by the first hard frost. Though the roots of daylilies are very winter hardy, the leaves are not. Frosts quickly turn them yellow and then brown.
By the time early winter arrives, daylilies are nothing more than a pile of dead, papery, strap-shaped leaves. From here, the choice is yours. Certainly you will want to cut off and remove the dead leaves if there was any sign of disease during the growing season. But if your plants were healthy, you can opt to cut the leaves off now or wait until early next spring to do your pruning.
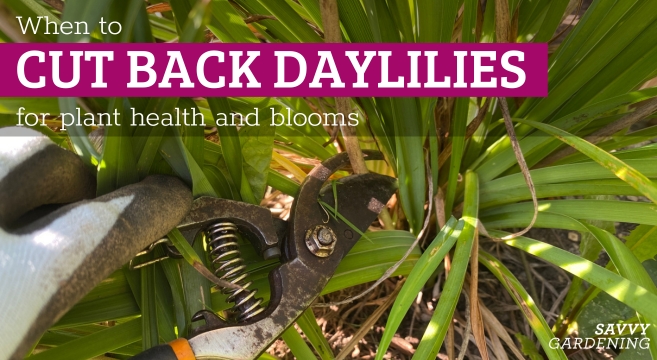
How to cut back daylilies
To prune daylilies, regardless of the time of year, use a clean pair of pruning shears or even a scissors. Some gardeners opt to use a sharp garden knife for the job. If you are just removing a few brown or yellow leaves, you may even be able to tug them off with your hands. But to fully cut down the plant mid-summer or at the end of the year, you’ll want a bladed tool for the job. Otherwise, you could end up accidentally pulling the roots up out of the soil as you try to tidy up the leaves.

To learn more about pruning daylilies and see how it’s done, please watch this video.
What to do after you trim
After pruning daylilies, there are a few tasks to do in order to foster healthy plants. Since even soil moisture levels are a must for daylily health, consider mulching the plants after pruning. An inch or two of shredded leaves (kept off the crown of the plant, of course), helps hold in rainfall and limit weeds. As it breaks down, it also adds nutrients to the soil to fuel future daylily growth. Keep daylily plants well-watered during times of drought.

Dynamic daylilies
Day lilies are strong plants capable of blooming even under less-than-ideal conditions. However, keeping the plants in good shape by pruning them at the three times featured in this article will keep your plants looking – and blooming! – their best.
For more on caring for popular perennial plants, please visit the following articles:
- When to cut back iris plants
- Pruning hostas
- How and when to trim peony plants
- Shasta daisy care
- More about daylilies
Pin this article to your Garden Maintenance board for future reference.

I tried the after bloom prune last year in NB, Canada (east coast, zone 5b), and the plant didn’t seem to come back. Here, my blooms end early August and frost comes early October. I’m wondering how many weeks to expect for post bloom regrowth, to get a sense of whether it’s worth doing here (?).
Thanks,
Heather
It does take several weeks for the plants to flush out with new growth, so you may have to do some experimenting. It also depends on the variety you are growing and how early it blooms. In colder climates, early-blooming daylilies can be cut back earlier, giving them more time to re-sprout. Again, you may have to experiment a bit.
I leave the dried flower stalks of the daylilies over the winter. There are native bees that overwinter in the stalks. It’s an easy way to encourage more pollinators. Come Spring, I cut down the stalks or pull them off when the plants are just emerging new shoots.