This post may contain affiliate links. If you make a purchase through links on our site, we may earn a commission.
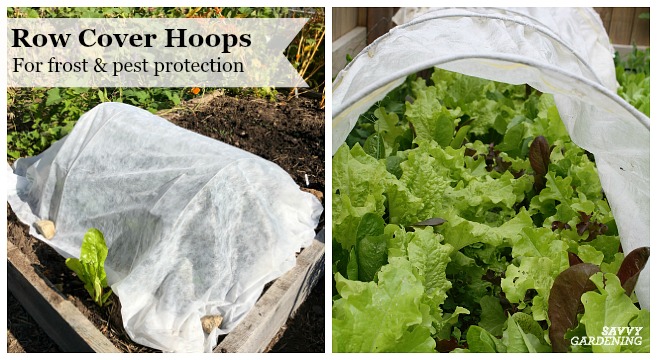
In my books, The Year-Round Vegetable Gardener and Growing Under Cover, I write extensively about the row cover hoops I use to stretch the harvest season in my vegetable garden. I use them to get a head start on spring planting, but also in autumn to protect from frost and cold weather. Simple row cover hoops can also be used during the growing season to shelter vegetable plants from pests like flea beetles, potatoes beetles, and squash bugs, or even larger pests like rabbits, deer, and birds.
Row cover hoops are one of my secrets of a healthy, long-producing vegetable garden. Plus, they’re quick and easy to set up which is very handy if an unexpected frost or bad weather is in the forecast. In my online course, How to Build & Use Mini Hoop Tunnels in the Vegetable Garden I talk about how they’ve been a game changer in my food garden. Read on to learn more about the various ways you can use hoop tunnels, as well as the various materials I use to make my structures.

Two ways to use row cover hoops:
Frost protection
Traditionally, vegetable gardeners wait for the last spring frost to pass before planting most of their crops. By using protective covers, however, I plant weeks – sometimes months! – earlier. I’ve been using these handy covers for many years to grow more food in my garden and harvest year-round.
In spring, I’m sowing seed for cool season greens like arugula, leaf lettuce, spinach, tatsoi, scallions, and Asian greens beneath my tunnels. I’m also transplanting seedlings of crops like broccoli, cabbage, and artichokes. But, these simple covers are also a convenient way to keep frost-sensitive tomato and pepper seedlings insulated from the up-and-down weather of spring. The tunnels capture heat and create a microclimate around these tender plants which reduces the risk of cold damage.

Pest protection
When using row cover hoops to prevent pests, remember that you also need to practice smart crop rotation. If you’re growing the same crop in the same bed year after year and having problems with the same pest, covering that bed with a row cover isn’t going to solve your problem. In fact, you’ll likely just trap that pest beneath the cover, giving them free rein to munch your crops. Instead, be sure to rotate crop families each year by planting them in a different bed or different section of your garden.
It’s also important to consider timing – when do you put the protective tunnel over your vegetables and how long do you have to leave them on? To be most effective, I place tunnels over my garden beds immediately after seeding or transplanting the pest-susceptible crop. Why? Because I’ve been in the garden transplanting broccoli seedlings into my garden with cabbage moths flying about my head trying to land on the broccoli plants. If you wait to cover them, you may be too late.
The length of time the crop needs to covered depends on several factors: 1) the type of pest, 2) when it’s most damaging, and 3) the type of crop. For example, flea beetles are most damaging to cabbage family crops like arugula in spring when the pests emerge from the soil. A lightweight row cover prevents them from accessing the arugula and can be left in place until you’ve harvested all of your crop. It’s a different matter for vegetables like cucumbers, squash, or melons which need to be pollinated to produce their crop. In this case, you can use row cover hoops to prevent squash bug or cucumber beetle damage to the young plants but then remove the covers when the plants begin to flower so pollination can occur.

The best materials for row cover hoops:
The materials I use for my row cover hoops are easy to source, inexpensive, and durable. To prolong their life, I store them in my garden shed or garage when they’re not in use. When making a mini tunnel, I space hoops three to four feet apart.
PVC hoops
For well over a decade I’ve been using half-inch diameter PVC conduit to make hoops for my garden beds. It’s an inexpensive product that’s easy to source at your local home improvement centre and comes in ten-foot lengths. PVC bends easily over a bed to make a quick hoop. You can insert the end of the PVC directly into the soil, but I find these hoops are more stable when a one-foot long rebar stake is inserted into the soil first and the end of the hoop is then slipped over the stake.
Wire hoops
Wire hoops are perfect for spring, summer, or autumn row cover hoops, but they’re not strong enough to stand up to any snow load so I don’t use them in the winter garden. I use nine gauge wire, which comes in a coil. I cut them into five to six-foot lengths to top three to four-foot wide beds. Once inserted into the soil, they’re about 18-inches tall. They’re fine for light frost protection, preventing fleas beetles from damaging compact crops like arugula, or for covering young squash plants to prevent squash bugs from accessing the crop.

Metal hoops
About five years ago I got a Quick Hoops Low Tunnel Hoop Bender from Johnny’s Selected Seeds and it transformed my winter low tunnels. I had been using PVC for these structures but I always had to add a center support down the middle to prevent them from collapsing under heavy snow. The metal hoops are much stronger and I can now build a quick mini hoop tunnel without needing to reinforce the hoops. Plus, bending a half-inch diameter length of metal conduit into a hoop takes less than one minute with the bender so it’s fast and easy to make super strong hoops. To read about my metal hoop upgrade, check out this article.
Kits for row cover hoops
Of course you can also buy pre-made mini hoop tunnels. I have several of these structures in my garden, some covered with row cover fabric and others with polyethylene. Last year, I got a Bio Green Superdome Growtunnel which has a polyethylene cover and appreciate its quick set up, height, and convenient venting sides. A row cover tunnel like a Tierra Garden Easy Fleece Tunnel is another instant structure that’s perfect for salad greens, squash or cucumber seedlings, or kale plants. If it’s insects you wish to omit, use a kit with a lightweight insect barrier cover like the Gardman Insect Mesh Grow Tunnel.

Types of covers for row cover hoops
Depending on the type of row cover, it can offer several degrees of frost protection, but remember that the thicker the cover, the less light will pass through. That’s not a big deal if you’re using it for winter protection when plants are mostly dormant. But, if you wish to encourage quick, healthy growth in spring, you’ll want a fabric that allows plenty of light transmission.
Row covers also come in a wide range of widths and lengths – read the package description carefully to make sure you’re buying the right size. Early on, I bought a seven-foot wide fabric thinking that it would be enough to cover my PVC hoop tunnels, but I was wrong! I was about six inches short on fabric and had to work hard to push the PVC hoops super far down in the soil so that I could completely cover the tunnel.
Insect barrier screening
More mesh than fabric, these durable mesh cloths prevent bugs, moths, slugs, birds, deer, rabbits, and other creatures from accessing your vegetables, herbs, or flowers, but still allow plenty of light and water to pass through.
Lightweight row covers
Lightweight row covers are the most widely used fabrics and are ideal for light frost protection, general bad weather protection (hail, downpours, etc.), and to omit insects and other garden pests. They allow about 90% of light to pass through to your vegetables and offer a few degrees of frost protection.

Medium-weight row covers
Slightly heavier than lightweight covers, these materials allow around 70% of light to pass through and provide up to a 6 degrees F (3 to 4 degrees C) of frost protection. I use these in spring or fall as a temporary cover if there is a hard frost in the forecast.
Heavy-weight row covers
Heavy-weight covers are used mainly as winter covers because they block 30 to 50% of the light. You can use them as temporary covers in the case of frost, but don’t leave them on for more than a day or two during the growing season as they block too much light.

How to attach the covers on row cover hoops:
To be effective against pests, you’ll need to securely attach the covers to their hoops and weigh them down at the bottom. It’s amazing how easy it is for insects to sneak under an unsecured cover or for the cover to blow off in a storm.
There are a variety of ways to attach a row cover to a hoop. Here are the three materials I use to secure my row covers:
- Clips – There are many types of clips and clamps available at garden supply and hardware stores, and I’ve found snap clamps to be the most convenient. They pop on or off easily but hold the cover tight against the strongest wind gusts. Do be careful when you remove them from the hoops as if you’re not careful, you can easily tear lightweight fabrics. For insect prevention, I still secure the bottom of the row cover with weights or staples.
- Weights – If I’m using a cover for temporary frost protection I often just weigh down the fabric at the bottom with something heavy like rocks, logs, lumber, or small sandbags. Just be sure that whatever you use doesn’t have sharp edges which could tear the fabric.
- Garden staples – Garden staples or pegs do tear a hole in the fabric to hold them tightly to the soil. They work great and I don’t mind using these if I’ve got old covers, but if my covers are in good shape, I don’t like to put holes in them as it shortens their lifespan. Instead, I’ll weigh them down and use snap clamps.

Learn more about my online course on using mini hoop tunnels in the garden in this video:
For more information on protecting your crops from pests or extending the harvest, check out these posts:
- Niki’s metal hoop tunnels
- How to mulch root vegetables for a winter harvest
- 8 vegetables to harvest in winter
- Cabbage worm ID and control
- Preventing pests in your garden: 5 strategies
Do you use row cover hoops in your garden to protect from frost or pests?

i use a worn-out hose to secure the edges of the row cover material which i use to protect my cabbages from insects. However, determined mice can still get in.
That is a great tip!! Thank you for sharing Alastair! – Niki
Thank you for the tip!
Hello! I really enjoy your books and blog posts! I am having a slug problem this summer (second year gardening here and didn’t notice any last year). Do you know if there is anything I can do over the winter to help with the problem next year? I plan to rotate more as I didn’t do that this year. I’ve tried copper and sand and hand pick too. Also tried a row cover but I think they snuck underneath.
Any suggestions? Thank you!
Hi – What tool do you use to cut your 9-gauge wire? I have some wire, but I’m not sure how extreme a bolt cutter, etc. I should get to cut it. Thanks!
Hi Anne, I use wire cutters or the wire cutting notch in the blade of my hand pruners. No need to get bolt cutters, but great question! 🙂 Niki
I use wire supports for political signs as hoops. They resemble large staples. Just pull the plastic signs off and they are ready to go. They are quite strong. I no longer dread election years.
Great suggestion, thanks Paul! 🙂