This post may contain affiliate links. If you make a purchase through links on our site, we may earn a commission.
If you’re looking for a few cool edibles to add to your garden, look no further than the pungent roots of wasabi and horseradish. While you may think that growing wasabi and growing horseradish are difficult tasks, with the right know-how, you can grow your own harvest of these two powerful spices. In the following excerpt from our favorite spice-growing book, Grow Your Own Spices, author Tasha Greer explains everything you need to know to cultivate both of these spicy, sinus-clearing edibles. This excerpt was provided by the book’s publisher Cool Springs Press/The Quarto Group and used with their permission.

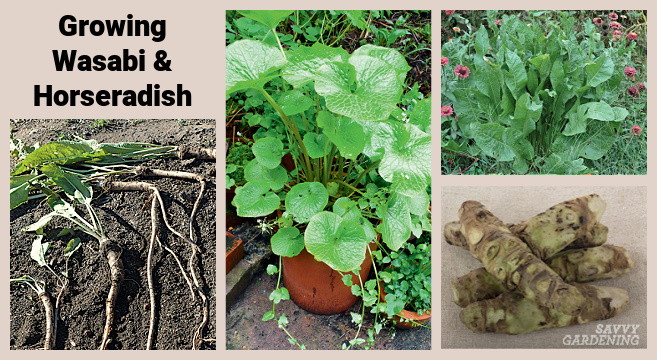
Growing wasabi
SPICE PROFILE
• Names: Japanese horseradish
• Latin: Eutrema japonicum (syn. Wasabia japonica)
• Native to: Japan
• Edible parts: Entire plant
• Culinary use: Spicy, burning, hot mustard taste used for sushi
GROWING CONDITIONS
• Subtropical perennial
• Mature plant tolerance 27–80° (-3–27°C); ideal range 45–65° (7–18°C)
• Full shade; fertile, moist soil; pH 6.0–7.0
• Start from plantlets or seeds; 18+ months to harvest

Saffron is the most expensive spice in the world in terms of weight. Wasabi, however, is the rarest in terms of production. Most of what is labeled as wasabi is a combination of horseradish, mustard, and food coloring.
Real wasabi is primarily cultivated in its native homeland of Japan. Due to culinary popularity, countries such as the U.S., New Zealand, China, Vietnam, Israel, Canada, and Australia have also dabbled in growing wasabi.
Generally, most people believe wasabi production is limited because of the difficulty of growing this semi-aquatic plant outside Japan. However, the truth is, it’s not difficult to grow wasabi if you know how.
Young wasabi plants start settling in by forming deep roots in loose soil. Then leaves begin to grow. In a few months, a stubby stalk becomes obvious above the soil line. As older leaves grow large, age, and die, newer leaves form from the top center of the aboveground stem.
Slowly, the stubby stalk gets incrementally taller. When the dead, withered leaves fall away, ridges or scales remains on the stalk. The aboveground stalk is actually a fattened stem, often referred to as a rhizome, that we think of as wasabi. This leaf-molting/stalk-growing process gives mature wasabi the appearance of a miniature palm tree with rounded leaves.
Wasabi plant care
To start wasabi at home, find a seller of the plantlets. Unless you can pick them up locally, plantlets are usually shipped in cool temperatures.
You will need to grow wasabi mostly outdoors, in a shaded area such as under an outcropping of trees. You will also need to water often. So, easy access to cold water is important.
You can plant well-rooted wasabi plantlets in the ground, in raised beds, or in containers. Containers are necessary in cold climates as you’ll need to bring plants indoors if temperatures drop below 30° F (-1°C). Indoors, place plants next to a window on the shady side of your home.
Wasabi likes good garden soil that is heavily amended with leaf mulch, peat moss, or perlite to improve drainage. Make sure you can pour a gallon or two of water through your soil mix without it becoming boggy before planting.
Plant the wasabi root line slightly above the soil level. It will settle a bit when you water. Do not cover any part of the above ground stem or this might cause rotting. Mulch with small pebbles to preserve moisture. This also protects the above-ground wasabi stem from sinking when watered.
Water wasabi daily with cold water to keep the roots and soil cool. Water twice daily, with cold water, on hot days. Use compost tea or other liquid fertilizers weekly to replace nutrients lost to frequent watering.

Growing wasabi from seed
To start wasabi from seed, place 15–20 seeds in a 4-inch (10 cm) container of prepared soil. Cover seeds with a sprinkle of compost and a layer of chicken grit to protect it during heavy watering.
Place pots in a shady location outdoors in late winter or early spring to vernalize. Water enough to keep the soil moist until seeds sprout; this generally takes several months. When seedlings have established roots, treat them like plantlets.
Harvesting wasabi
Harvest your fresh wasabi in 1½–3 years, depending on desired size. Harvest the entire plant. Snap off your best plantlets and start replacement plants.
Trim the leaves and roots. Before grating, use a sharp knife to scrape off the ridged leaf nodes on the stem. Use a wasabi grater or cheese grater to shred your wasabi.
According to Japanese tradition, you must grate wasabi with a smile. Also, inhale deeply as you do to clear your sinus passages. Eat within 15 minutes of grating. Wrap unused portions in wet newspaper and store in your crisper for up to 2 weeks.

Medicinal tip for wasabi
Wasabi, while elusive outside of its native region, has established uses in herbal medicine. Highlighted for its rich poly-phenol content, wasabi effectively scavenges free radicals verifying its traditional uses of increasing longevity and health in those who consume it. Its anti-inflammatory activity is highly active throughout the nervous system and works to reduce neuroinflammation in the brain. Use homegrown wasabi grated fresh whenever a harvest is possible.
Growing horseradish
SPICE PROFILE
• Name: Horseradish
• Latin: Armoracia rusticana (syn. Cochlearia armoracia)
• Native to: southeastern Europe and Western Asia
• Edible parts: Entire plant
• Culinary use: Peppery, spicy, and slightly sweet with sinus-clearing attributes; used as a meat condiment
GROWING CONDITIONS
• Cool-season perennial, usually grown as an annual
• Mature plant tolerance -30–85ºF (-1–29°C)
• Protect from prolonged heat
• Full sun to part shade; fertile, well-draining soil; pH 5.5–7.5
• 180+ days for large roots

When excavated fresh from the soil, horseradish has no aroma. Until you break its skin, you would never know the potency inside. Once you do, enzymes exposed to air volatize and create the nose-clearing “burn” commonly associated with horseradish.
That potency quickly mellows unless you preserve horseradish in vinegar. The standard 5 percent acidity of distilled vinegar has a neutral flavor and works well for this. Just smash freshly grated horseradish into a jar and fully submerge it in vinegar as fast as you can. Or cut up pieces and put them in your food processor, pulse to perfection, add vinegar, and jar.
The trick is to stop the air exposure by adding vinegar exactly when the freshly grated horseradish tastes perfect to you. Generally, that will be between 30 seconds to a few minutes of breaking its skin.
Growing horseradish is as easy as preserving it if you know its secrets. Frankly, few people take the time to fully appreciate the features that make horseradish one of the most fascinating spices to grow.
In deep, fertile soil it develops a thick, straight taproot. At whatever depth the soil becomes nutrient-depleted or compacted, the root turns at a 90-degree angle. Then that root grows horizontally until it reaches soil with more nutrients. From there it grows downward again, until the nutrients run out and it makes another turn.
Plant stress, or severing, will cause parts of those pervasive roots to send stems skyward. There, they form a crown and leaves and become a new plant.
This capacity to seek ever-deeper soil and to reproduce when injured or threatened lead some people to call horseradish “invasive.” As a horseradish lover, I just call it “easy to grow.” Still, if you want your horseradish to stay in place, grow it in a deep, elevated container.
Horseradish plant care
Start horseradish several weeks before last frost, as soon as you can work the soil. Space in-ground plants, grown as an annual, 2–3 feet (61–91 cm) apart. Or use 3- to 5-gallon (11–19 L) containers.
Plant ¼- to ½-inch (6–13 mm)-wide lateral roots cut into 6-inch (15 cm) segments. Bury the entire cutting at a 45-degree angle. The top should start about 2 inches (5 cm) under the soil.
In shallow soil, or when growing as a perennial, angled root corners or crowns can be planted. The top of the fat side should be about 2 inches (5 cm) deep. The lower side should be planted horizontally to encourage lateral, rather than vertical, growth.
Additionally, you can transplant young horseradish plants that sprout from the severed roots of a parent plant. Horseradish can be started from seed, too, though it may produce plants that are very different from their parent plants.
In hot areas, give plants full sun in cool weather. Then, provide partial shade when temperatures are over 80ºF (27°C). Or grow from fall to spring in areas with no frosts.
To grow as a perennial, plants need 3–5 feet (91–152 cm) of space. In late fall, harvest the lateral roots located more than a 1-foot (30 cm) diameter away from the primary root as your harvest.

Harvesting horseradish
Harvesting horseradish is all about root excavation. Act as if you are on an archaeo-logical dig and carefully loosen and brush away soil to follow the full root length. If you leave any severed roots in the ground, they will eventually re-emerge as new plants.
Put fresh roots in a bucket of water to prevent the skins from drying. That way you can skip peeling them. Grate and preserve in vinegar.
You can store fresh horseradish in the fridge too. But its flavor and potency are stronger if it’s preserved in vinegar immediately after harvesting.
Medicinal tip for horseradish
Horseradish’s powerful stimulating effects make themselves known upon cutting into the pungent root. An antiviral herb that clears congestion and provokes secretion, it can aid in respiratory ailments when mucus is thick and obstructive.
You can make a traditional herbal preparation known as fire cider using freshly grated horseradish combined with spicy foods such as garlic, onion, hot peppers, and ginger, which is then steeped in vinegar. Temper it with a bit of honey. Then use as needed when a cold or flu hits.
For more on growing wasabi, horseradish, and other amazing spices such as ginger, turmeric, saffron, vanilla, cardamom, and more, pick up a copy of the beautifully illustrated and useful book Grow Your Own Spices.
Additional articles on cultivating herbs and spices:
- Garlic: Hardneck vs softneck
- 10 Herbs that grow in shade
- How to harvest chives
- Parsley growing tips
- Harvesting lemongrass

Leave a Reply