This post may contain affiliate links. If you make a purchase through links on our site, we may earn a commission.
For gardeners who want extremely low maintenance, a self-watering planter is the best way to grow. These containers provide water to plants from a reservoir beneath the soil, ensuring plants always have the perfect amount of moisture, and maintaining them requires nothing more than an occasional refill of their reservoir. But commercial brands of self-watering containers are expensive. That’s where making your own DIY self-watering planter comes into play. In this article, I share step-by-step plans for the DIY self-watering planter I’ve been making and using for years. It’s a game changer for container gardening!

How self-watering planters work
Before we get to the DIY, let me share a little bit of info about why I love self-watering planters so much and how they work.
Self-watering containers, also called sub-irrigated planters, are designed in a way that allows the plants growing in them to access water whenever they need it. These pots have a separate enclosed water reservoir beneath the planting area. Water is drawn out of the reservoir (sometimes called a wicking chamber) and into the potting soil through wicking action. As the plant roots suck water up out of the soil, more water is drawn up from the reservoir to keep the soil moisture levels optimum without letting the roots sit in water. The reservoir system of a self-watering planter keeps soil moisture levels at the sweet spot while preventing the root rot often caused by letting water sit in a saucer beneath a plant.

The benefits of using self-watering planters
Beyond this underground wicking action keeping foliage dry and suppressing fungal diseases on certain plants (tomatoes, I’m talking to you!), self-watering containers also reduce the frequency of waterings and save wasted water by preventing runoff. They are one of the easiest ways to save water, time, and energy in the garden.
Though they aren’t truly self-watering—you still have to fill the reservoir when it gets low—using self-watering containers significantly cuts down on the amount of time you’ll spend watering. I fill the reservoir in my DIY self-watering planter featured below only once every 10 days or so, except in extreme heat where it’s more like once a week.
Why opt for a DIY self-watering planter
The only downside to self-watering containers is the cost of commercial brands. Though they’ll last many years, and they come in a wide range of colors and styles, commercially made self-watering containers aren’t cheap. I’ve found that making my own DIY self watering planter is easy to do and less costly than using commercial brands, especially if you need large ones. In choosing your materials for this DIY, you will have some options on color choices, so that’s good news, but DIY versions are not as “high-style” as the commercial ones. Still, I think the cost savings make creating these DIY self-watering planters totally worth it.

How to make a DIY self-watering planter
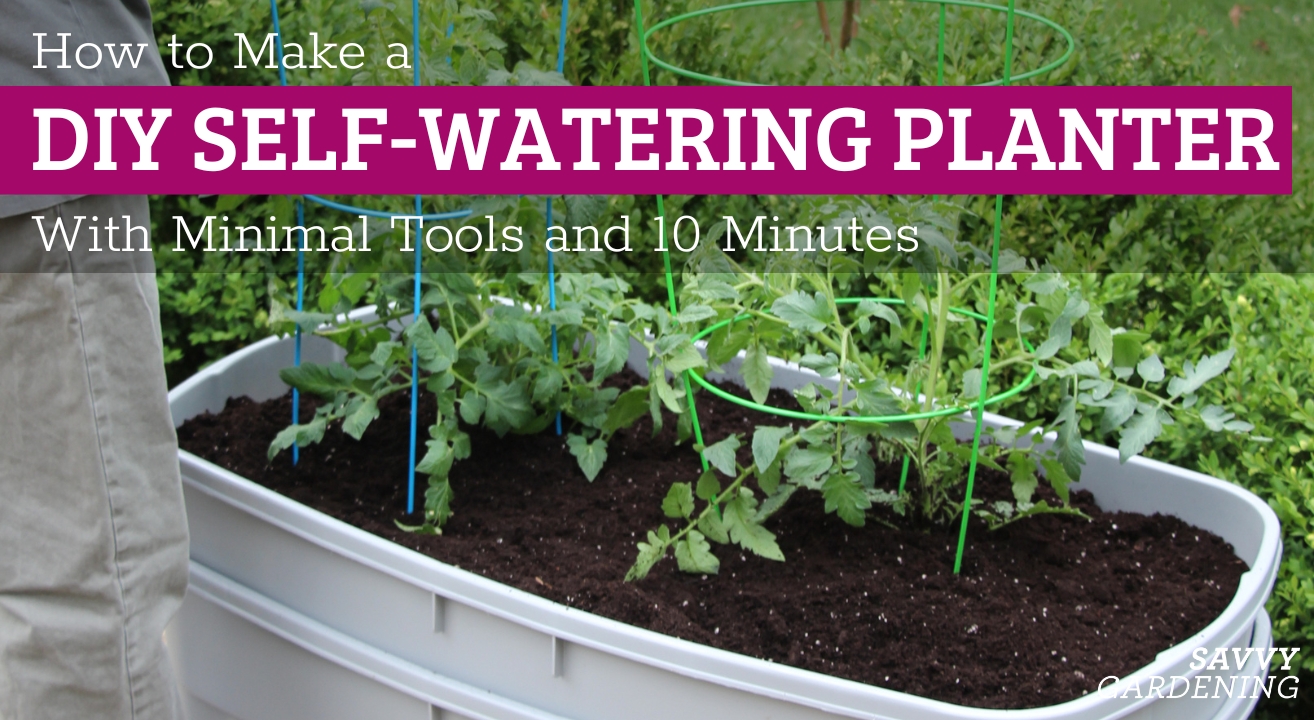
The following step-by-step plan lets you make several self-watering containers for the cost of a single manufactured one. I use large, 50-gallon storage bins—like the ones in the photographs—to grow tomatoes, zucchini, and other big veggies, or you could choose smaller bins for smaller plants or smaller spaces (see tip below for using a 5-gallon bucket for this DIY). Simply follow the steps below to turn a pair of plastic storage bins of any size into an inexpensive, self-watering planter.
The DIY sub-irrigation system I’m about to present requires no drill bits or drilling, no PVC pipes, and no special tools beyond a utility knife. It is easy and appropriate for every growing climate. And you can build one in about 10 minutes!

Materials needed to make one DIY self-watering planter
- 2 plastic storage bins of the same type and size (the ones I use are 50-gallon)
- 1 old, cotton hand towel
- Enough 50/50 potting soil and compost blend to fill one of the bins completely
- Old bricks or blocks
- Plants!
Tools needed for this DIY self-watering planter
- Utility knife
- Gloves
- Scissors
Steps for making a DIY self-watering planter
Here are the simple steps I use to make what I consider to be the best homemade self-watering containers.
Step 1: Make the wick hole
Use a utility knife to cut a two-inch square hole in the middle of the bottom of one of the storage bins (let’s call this bin #1). There’s no need to be exact about the hole’s placement, as long as it’s somewhere close to the center.

Step 2: Make the wick
Cut the cotton hand towel lengthwise, to make four strips of the same approximate width. Again, there’s no need to be exact.

Step 3: Create your reservoir space
Place the second bin, the one without the hole in it (bin #2), wherever you’d like your planter to be located, making sure the bottom of the planter is on a solid, level surface. Then, stack columns of bricks or blocks in the bottom of this bin to create a reservoir for the water. Stack the bricks into columns that are anywhere between four and eight inches high, but keep in mind, the deeper the water reservoir, the more water it holds and the less often you’ll have to fill it up. For larger bins, like the ones I use, make three columns of bricks. Smaller bins will only need two columns to support them. Do not place a column of bricks in the exact center of the bin as it could restrict the movement of water.

Step 4: Cut your fill/overflow hole
Use the utility knife to cut a two-inch square hole into the back of bin #2, the one with the bricks in it. The top of the hole should be the exact same height as the top of your brick columns. Once your planter is filled with soil and plants, you’ll fill the water reservoir through this hole. But, the same hole also serves as an overflow outlet. If the reservoir gets too full, as sometimes happens after a heavy rain, the excess water will drain out this hole.

Step 5: Fill the reservoir
Fill the reservoir with water up to the bottom of the fill/overflow hole.

Step 6: Add your planting bin
Place bin #1 into bin #2, nestling it securely inside and making sure the bottom of bin #1 is resting on top of the brick columns.

Step 7: Layout the wick
Gather the strips of cotton hand towel together and insert one end of them into the hole in the bottom of bin #1. Push the end of the towel strips down until the amount of towel extending down into the lower bin is slightly more than the height of your brick columns. Then, spread the upper portion of the towel strips out into the bottom of bin #1, in a “+” shape.
The towel strips serve as a wick, drawing water out of the reservoir and delivering it to the soil in bin #1 as the plants need it. If you’ve done it correctly, the towel strips should quickly become saturated. They begin to draw water out of the reservoir the moment they come in contact with it. There is no need to create additional drainage holes in the bottom of bin #1 beyond the one the towels are coming through.

Step 8: Add the soil
Fill bin #1 with a 50/50 mixture of high-quality potting soil and compost. Don’t overfill; leave an inch of headspace at the top to collect any rainfall.

Step 9: Get planting
Plant! My 50-gallon self-watering planters are planted with transplants of two patio-type bush tomatoes, two basil plants, a cucumber vine, and a hot pepper plant. If you use smaller bins, you’ll have to whittle down your plant list. Water the plants in from the top after planting. This will be the only time you’ll need to water from the top. For added moisture control, you can also add a 2-inch-thick layer of mulch to the top of the soil surface after planting, but this is optional.

Step 10: Add plant supports
Insert stakes and cages, if necessary. I use two colored tomato cages to support the tomato plants as they grow.

Step 11: Fill when the reservoir gets low
Though you won’t have to add water to the reservoir every day, you will have to check it from time to time to make sure there’s always water in it. Fill the reservoir by inserting a hose into the hole in the back of bin #2 and letting it run until water starts coming back out of that hole. How much water you’ll need to add in order to top-off the reservoir depends on how empty it was when you started. Nutrients in the form of a liquid organic fertilizer can be added to the reservoir every few weeks.

What to grow in your new DIY self-watering planter
You can use these homemade self-watering containers to grow vegetables, small fruit trees, culinary herbs, or colorful flowers. You can even use them to grow root crops, like onions, carrots, and beets. I’ve also used them to grow strawberries, blueberry bushes, currants, melons, and even summer bulbs like lilies, cannas, and caladiums. You can’t go wrong!

Small-space DIY self-watering planter idea
For those with limited growing space, another cool trick is to use this same method using two five-gallon buckets, instead of big storage tubs to create a smaller self-watering system. You can use an old t-shirt or a cotton towel as your wick. Plant one patio-type determinate tomato, one eggplant, two cucumbers, two small peppers, 3-5 basil plants (as shown in the photo), or a handful of herbs per bucket.

For more creative DIY projects, visit the following articles:
Leave a Reply