This post may contain affiliate links. If you make a purchase through links on our site, we may earn a commission.
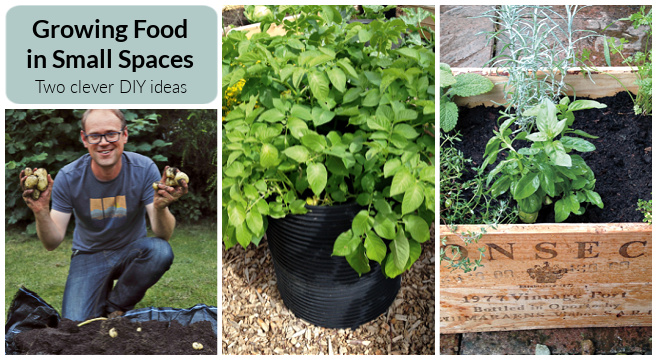
Would-be food gardeners who are short on garden space but want to grow vegetables and herbs can find success in container growing. You can use traditional containers, like plastic pots or you can up-cycle materials like trash cans and wood crates as demonstrated in the below DIY’s. These fun and easy projects are perfect for growing a bumper crop of potatoes and culinary herbs and use inexpensive and easy-to-source materials. We have excerpted the following DIY’s from GrowVeg: The Beginner’s Guide to Easy Vegetable Gardening by Benedict Vanheems and used with permission from Storey Publishing. The book is packed with dozens of clever ideas for growing tasty and attractive edibles when your ambition is bigger than the space you have to grow. Keep reading to learn more about growing potatoes in trash cans and kitchen herbs in recycled wood crates.

Trash Can Spuds
Garden-grown spuds should be viewed with nothing but the utmost reverence, my friends! Not only do fresh potatoes boast outstanding flavor, unearthing these nutritious nuggets of garden gold is guaranteed to imbue you with smug satisfaction — and who can blame you!
Given all that, growing potatoes in a trash can/dustbin could be interpreted as, well, a little disrespectful. But there’s logic behind the apparent madness. Potatoes grow fast, producing lots of floppy foliage that makes them hungry for space, but grow them in containers and their boisterous behavior is instantly tamed. Nevertheless, the more space the tubers have to develop, the more you’ll get. Old (cleaned out!) trash cans are the ideal compromise: space to grow yet still contained.
Container-grown spuds bring a potato sack full of other benefits, too. It means you can grow potatoes on the patio or balcony. There’s no need to worry about soilborne problems like scab and nematodes/eelworms. And because they are portable, you can start your potatoes somewhere frost-free, then move them outside once the weather improves.
The best way to serve your potatoes? Steaming hot with a generous dollop of butter, a grind of the peppermill, and a sprinkle of garden herbs such as parsley, chives, or mint. Irresistible!

Start Off Your Spuds
Potatoes are grown from “seed potatoes” — small potatoes held over from the previous season to plant the following year. While you can save your own seed potatoes, this risks transferring disease from one crop to the next. It’s better to buy fresh seed potatoes from a reputable supplier.
Get a head start in cooler regions by sprouting (also known as “chitting”) seed potatoes before you plant them. Set seed potatoes so that the end with the most eyes, which is where the sprouts will grow from, faces up. Egg cartons are handy to hold them in place so they don’t roll about. Sprout potatoes on a bright windowsill up to a month before planting.
No trash can? No problem! Use any large container, or buy large grow bags. Whatever you use must have plenty of drainage holes in the bottom. If it hasn’t got any, drill some.
Supplies
- Trash can/dustbin or other large container
- Drill and drill bits
- Soil-based potting mix
- Seed potatoes
Timings
- Sprouting: Late winter
- Plant indoors: Late winter to early spring
- Plant/move outside: Mid-spring
- Harvest: Late spring to late summer

Step by step to planting the potatoes:
- The bin should be at least 20 inches (50 cm) diameter. Drill some drainage holes into the base.
- Put a 6-inch (15 cm) layer of the potting mix into the bottom of the bin.
- Lay two or three seed potatoes or chunks on top so the sprouts face up. Cover with another 4 inches (10 cm) of potting mix, then water well.
- Add more potting mix in stages, burying the foliage whenever it reaches 6 to 8 inches (15 to 20 cm) high, so that just the top inch (about 3 cm) is left exposed. Continue until the potting mix reaches the top.

Other Ways to Grow Spuds
- Sacks. Simple burlap/hessian sacks are a handsome way to grow spuds, or opt for longer-lasting grow bags that are made for the job.
- Barrels. Plastic or wooden barrels offer lots of legroom for roots to stretch out, which means happy plants and more potatoes.

When to Harvest
Potatoes are so easy to grow: just keep plants well watered, warm (but not hot), and somewhere sunny. Shade the can or bin among other plants or pots if it is very hot, so that just the foliage is in the sun. Water with an organic liquid fertilizer every few weeks to encourage strong growth. The only tricky bit is gauging when to harvest them, but even that’s easy once you know how.
Young new potatoes may be harvested as soon as the plants’ flowers begin to fade. You can take a few potatoes at a time while leaving the remaining tubers to grow on. To do this, carefully reach down into the potting soil to feel for the tubers. Try not to disturb the roots. If the potatoes feel as big as an egg, they’re good to go. If not, leave them to grow on. When they’re ready, simply upend the entire container and gather up the horticultural gold!

Harvest Potatoes the Tidy Way
- Cut back the stems so they don’t get in the way and add them to the compost heap.
- Lay down a tarp or sheet. Upend the trash can/dustbin and shake back and forth to empty the contents. Gather your potatoes.
- Spread them out to dry for a couple of hours out of direct sunlight. Store the potatoes somewhere cool and dark.

Crate expectations
Herbs turn a recipe from only average to distinctly delicious. Whether it’s potatoes roasted with rosemary, a fish pie laced with dill, or a dish decorated with a final flourish of parsley, our kitchen creations would sorely lack without them.
Packets of fresh herbs from the grocery store aren’t cheap — and within days they’ve gone limp or blackened round the edges. I’m sorry, but purchased dried herbs are a wholly unsatisfactory alternative!
As with any of our awesome edibles, the key to a steady supply of herbs with unrivalled taste is to grow them yourself. Grown as close to the house as possible, an at-the-ready selection means you’re more likely to include them in your cooking. Pick as much as you want, when you want, and your herbs will respond by growing more.
Herbs represent outstanding value for the initial effort involved in planting them. This project uses an old wine crate to really set the plants off. Pop it somewhere sunny and it will attract a host of bees and butterflies, too, drawn to blooms wafting their rich, aromatic fragrance.

Plant a Crate of Herbs
Pick up a vintage crate online or at your local flea market. Many crates come with their fair share of cracks or gaps, so if necessary, line yours with landscape fabric or, for a natural alternative, burlap/hessian.
Combining herbs that prefer the same growing conditions makes the crate easier to look after — a great excuse to plant a couple of crates. Or grow the herbs together, then break the plants apart at the end of the growing season to transplant elsewhere according to their preferred soil and light conditions.
Supplies
- Wine crate or similar container
- Drill and drill bits
- Soil-based potting mix
- Herb plants
Timings
- Plant: Spring to summer
- Harvest: Year-round
Step by step to planting the crate:

- This crate doesn’t have any cracks or holes in it, so the first job is to drill some holes at regular intervals across the bottom of the crate.
- Fill the base of the crate with a layer of potting mix, then position the herbs, still in their pots, to determine the best arrangement. Remove the herbs from their pots and set in place.
- Now work the potting mix in between the rootballs, firming as you fill. Leave an inch (about 3 cm) gap at the top of the crate to serve as a watering reservoir.
- Give your herbs a thorough soaking to settle the potting mix. If necessary, top up with a little more soil so that the rootballs are buried.
Fresh is best, but it’s worth drying some herbs for winter. Hang cut stems up to dry; once they’re crisp, strip off the leaves and store in airtight containers.

The Next Step
Even woody perennial herbs like sage and thyme grow quickly early in their lives. By the end of summer, your herbs are likely to have filled out nicely and may need to be transplanted to prevent them from becoming straggly.
Consider the final size of the herb, and transplant accordingly. In temperate climates, taller perennials like rosemary will easily reach 3 to 4 feet (more than a meter) tall, while sage spreads out to a similar distance.

Transplanting Herbs
- Work around the roots of the herb with a hand trowel, then lift the herb out, retaining as much of the original root system as possible.
- Prepare the soil for woody perennials by working in a few trowels of gravel to improve drainage, then dig a big enough hole for the roots.
- Firm the plants into place, then water. Lightly trim the plants, cutting off any flowers once they have finished, to maintain bushy growth.
Want to discover more clever and easy DIY’s for growing food in small spaces?
If you’d like to learn more projects for growing vegetables, fruits, and herbs be sure to purchase a copy of GrowVeg: The Beginner’s Guide to Easy Vegetable Gardening (Storey Publishing, 2021). It’s packed with useful and detailed information on growing food as well as dozens of DIY garden projects.
About the author: Benedict Vanheems is a lifelong gardener and holds a BSc and a General Certificate in Horticulture from the Royal Horticultural Society. He has edited and contributed to a variety of gardening publications.
For more on growing food in small spaces, check out the following posts:
- How to grow cucumbers in a container garden
- The best tomatoes for containers and 7 strategies for growing them in pots
- Vertical vegetable gardening – DIY pole bean tunnels
- Cattle panel trellis; how to build a DIY garden arch
- The 7 best herbs for container growing

just beautiful and so filled with hope for so many people. thanks from the heart for your creativity and sharing with others