This post may contain affiliate links. If you make a purchase through links on our site, we may earn a commission.
When it comes to houseplants, watering is one of the hardest skills to master. Too little water and your plants die. Too much water and your plants die. No wonder new and experienced houseplants parents are worried about watering. This is where the technique of bottom watering plants comes in. Read on to learn more about the many benefits of bottom watering plants.

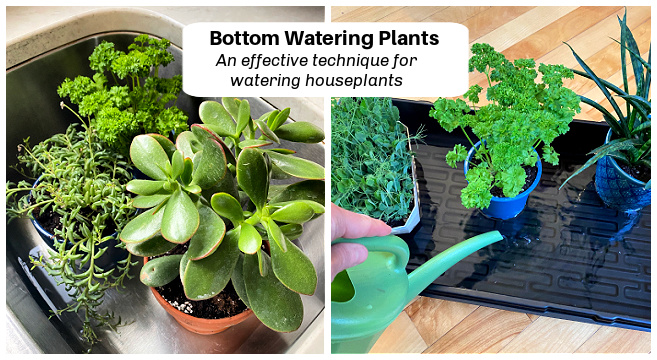
What is bottom watering plants?
Bottom watering plants is a method of watering that waters potted plants from the bottom up. The plant is placed in a tray or container of water and absorbs water via capillary action through the holes in the bottom of the pot.
Learning how to water correctly is an essential skill when caring for plants. Don’t water on a schedule. Instead pay attention to your plants, checking them once or twice a week and watering as needed. The easiest way to tell if it’s time to water is to stick your finger into the soil to check how moist it is. If it’s dry an inch down, it’s likely time to water. Of course different types of plants have different water needs so it also helps to learn about the specific plants you have. Cacti require less water than tropical plants, for example.

The benefits of bottom watering plants
There are many benefits to bottom watering plants. Here are the main reasons I use this technique to irrigate my houseplants.
Consistent watering – Bottom watering provides an even distribution of moisture throughout the entire mass of soil. Top watering can result in dry spots, but this isn’t an issue when water is slowly absorbed from the bottom. You can be assured your plants are getting enough water.
Reduce over and under watering – I’ve found bottom watering plants to be an effective way to prevent both under and over watering. It provides full soil saturation and the plant can then dry out to the appropriate level before you water again.
Prevents splashing – Many plants are sensitive to having water splashed on their leaves. And even if plants aren’t sensitive to wet leaves, you may end up with spots on the leaves from hard water. If you’re watering with a watering can avoid wetting the leaves. Watering a plant from the bottom eliminates this issue as well as the potential for water pooling in the middle of plants like succulents or snake plants. This is bad because water that gathers in the middle of a plant can cause promote rot.
Reduces mess – I’ll admit that I’m a bit of a messy waterer when I use a watering can. I tend to splash water over the plant, nearby plants, and sometimes even on the table or shelf. Bottom watering reduces spill and potential damage to furniture by keeping the water in a contained tub or tray.
It’s easy – Yup, watering your plants from the bottom is easy and doesn’t require any special skills or fancy equipment. More on that below!

The downside of bottom watering plants
In terms of plant health, there aren’t a lot of drawbacks to watering plants from the bottom. However, one consideration would be that continual bottom watering could lead to a build up of minerals and excess salts in the growing medium, especially if you’re using tap water. This is easily remedied by occasionally watering from the top to flush the potting mix.
What equipment do you need to bottom water plants?
The good news is that you probably don’t have to buy anything new to bottom water your houseplants. Many indoor gardeners use a sink or bathtub, or place their plants in a tray, saucer, or large container like a rubbermaid tub or tote. Just be sure whatever you use has no drainage holes (like a plant tray) and can hold several inches of water.
You may also wish to use a large watering can to fill the tray or rubbermaid tub. It’s not easy filling a big container in a sink and then lugging it to where you wish to set up. I usually end up sloshing water all over my floor! So instead, place the vessel in the desired spot and use a large watering can to add the water. You don’t need much! Just a couple of inches at most.
I also use one other piece of equipment when bottom watering: a plant tray with no holes. You can use them to soak the plants as well as to drain the pots once they come out of the water. If you’re watering in a bathtub or sink that has a plug you can pull it to drain the water away. However, if you use a rubbermaid tub or tote, or another type of container, it’s handy to have a spot for excess water to drain after soaking.
One more thought: make sure your houseplant pots have drainage holes at the bottom. If they don’t, you can’t bottom water the plants.

Bottom watering plants: step by step
As noted above, this is an easy watering method for indoor plants, but also container grown herbs and even vegetable and flower seedlings. Below you’ll find a step by step guide to bottom watering plants.
Step 1
Determine if your plants need to be watered. I don’t water on a schedule, but instead check my plants twice a week to determine if it’s time to water. How often you water depends on the species of plant, the type of potting soil, the season, and the indoor growing conditions. It therefore makes sense to base watering on a quick soil check, not a schedule. To gauge moisture levels, touch the top of the soil or insert your finger about an inch into the potting mix. If it’s dry, it’s time to water most types of indoor plants.
Step 2
Add or pour water into the bottom of the container, sink, or bathtub. The water level depends on the size of the pots you’re watering. For example, if I’m bottom watering a bunch of small 6 to 8 inch diameter pots, I’ll put 1 1/2 to 2 inches of water in the container. If I’m watering larger 10 to 14 inch diameter pots, I’ll add 3 inches of water to the container.
Step 3
Place the pots or planters in the container, sink, or bathtub. If your plants are potted in plastic containers, they may tip over and float instead of standing up in the water. To prevent this, use less water in the container or wet the soil from the top with a watering can to give the plant a bit of weight.
Step 4
Leave the pots soaking in the water for 10 to 20 minutes. I set a timer on my phone. When the top surface of the soil is moist, it’s time to take them out. Absorption time depends on the size of the pot and the type of potting mix. Check back after 10 minutes and if you notice the water has all been sucked up by the plants, add more.
Step 5
Once the plants have been bottom watered, the excess water needs to drain away. If watering in a sink or bathtub, just pull the plug to drain the water. If you’re using a tray or rubbermaid tub, remove the pots and place them in another tray for 10 to 15 minutes.

Tips for bottom watering plants
I’ve been bottom watering my plants for over ten years and have picked up a few tips along the way. Here are a few considerations to keep in mind when using this technique:
- Soil type – As mentioned above, the type of potting mix plays a role in how quickly water is absorbed. A sandy mix, like cactus mix, takes longer to moisten than a lightweight potting mix.
- Pot size – Bottom watering is ideal for small to medium-sized plants. Larger plants, especially those in clay pots are heavy and difficult to move and so I water them using a watering can.
- Fertilizing – If it’s time to fertilize your indoor plants (learn more about feeding houseplants in this article), you can add a liquid plant food to the water.
- Drainage materials – If you have houseplants with pot shards or drainage rocks in the bottom of the pot, you’ll need to place the pots in water deep enough to reach the soil level. Otherwise, water won’t be drawn up into the pot.
Which plants like bottom watering
I bottom water almost all my indoor plants. The exception is my big plants in large, heavy pots. I don’t want to throw out my back! I also water from the bottom when growing herbs indoors and starting seeds under my grow lights. Below I’ve highlighted certain plants which respond very well to bottom watering.
African violets
This popular houseplant is picky about watering. First, it’s sensitive to cold water and should be irrigated with lukewarm or tepid water. It’s also a perfect plant for watering from the bottom as splashing water from overhead watering can result in spots on the leaves.

Snake plants
Snake plants are among my favorite indoor plants. They’re very easy to grow and adaptable to a wide range of growing conditions. Plus, they’re forgiving if I neglect them occasionally. I’ve found that snake plants are also best watered from the bottom. They grow in a whorl of leaves and if you’re not careful when you water from the top, water may splash and collect in the middle of the plant. This can cause crown or root rot. Bottom watering is an easy way to avoid this issue.
Succulents
I am obsessed with my succulent collection and the assortment of foliage shapes and colors. These plants don’t need much water but when it’s time to irrigate, I water from the bottom. As with snake plants, if you water succulents from the top and wet the foliage, it can get trapped in nooks and crannies and cause rot.
Jade plants
I used to wonder why the leaves of my jade plants were covered in white spots. I now know these markings were mineral deposits from water splashed on the plant when I used a watering can to irrigate. Now that I water my jade plants from the bottom, the leaves are glossy and green.
Pothos
Like jade plants, Pothos can also be prone to leaf spots from splashing water. Bottom watering prevents spots and ensures good soil hydration.

Herbs
If you come into my kitchen you’ll find a handful of my favorite culinary herbs growing on my windowsill and beneath nearby grow lights. Essential herbs include parsley, basil, thyme, and rosemary and the plants need consistent moisture to produce a bumper crop of flavorful foliage. When it’s time to water my herbs I place them in a tray of water to ensure even, consistent soil moisture. Learn more about growing herbs indoors in this detailed article.
Vegetable, flower, and herb seedlings
I start a lot of seeds indoors and savvy seed starters know that just-sown seeds can easily become dislodged if watered from the top. I therefore water my seed trays from the bottom for the first few weeks. This is very easy to do as I start my seeds in cell packs placed in 1020 trays that have no holes. I use my watering can to add water to the tray which is then absorbed by the potting mix.
For more information about growing plants indoors, be sure to check out these articles:
- How to grow string of dolphins
- Plants that grow in water: A no-mess, low care method for growing houseplants
- Caring for Chinese money plant
- Apartment plants: 15 of the best houseplants for apartment living
What are your thoughts on bottom watering plants?

I really like using wick self-watering pots which is a form of bottom watering. My plants, Calathea, Pothos, Rex Begonia, Ficus Triangularis, and Spider have all done well in their wick self-watering pots that have clear bottom reservoirs with lips where I can add the water when needed. So I don’t need to lift them at all, unless I need to clean the reservoir. I find the pots that I use make it so easy and no guess work. My Snake plants are top watered. I use my drinking water which comes from our filter tap in the kitchen, so I do need to add minerals. I find my pots on Amazon. Some of the smaller ones have reservoirs that are too small and they need filling every couple of days, so I use a different style for baby plants that I do need to lift the inner pot that holds the plant to add water.
I have bottom watered and get that bone dry top couple of inches.have read it can’t be rehydrated. what soil do you use or recommend to bottom water only and see it moist at the top as you do? thank you
I’ve started bottom watering as a result of having a terrible fungus gnat infestation! I have a huge variety from FLF to ZZ’s so fingers crossed the change isn’t too much of a shock to the plant pals.
I have only tired this once and from what I have read on line the top of the soil should get wet as well. After leaving the plants sitting in water of over an hour and the top of the soil still not being wet I pulled them. I guess to see if plants need watering I will just have to lift them and tell by weight since the top two inches are bone dry still? If anyone has any suggestions please let me know.
Thanks,
kelli
Hi Kelli, My guess is that your potting mix, like most potting mixes, is peat-based. This is a hydrophobic material and once it has completely dried out it can be hard to get evenly moist again. So bottom watering would help, but you’d need to top water it as well. And it’s probably a good idea to use a chopstick or wooden skewer to poke holes into the growing medium. This will help the water move though the mix and also aerate the mix. Hope this helps!! Niki
This also helps with fungus gnats
Thanks for the tips! I’ve shared this post with some of my friends and will be sure to start bottom-watering my plants!