This post may contain affiliate links. If you make a purchase through links on our site, we may earn a commission.
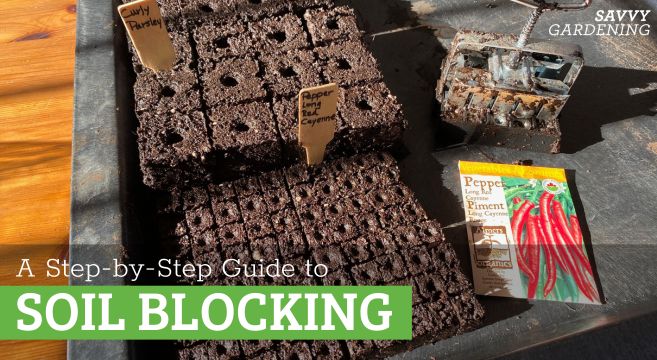
Soil blocking is a seed-starting technique that uses cubes of compressed soil to grow healthy, vigorous plants. It’s my go-to method for starting vegetable, flower, and herb seeds and produces a lot of seedlings without the need for plastic pots or cell packs. The cubes of soil are made using metal soil blockers which come in a variety of sizes. Soil blocking isn’t difficult but there are a few points to keep in mind to boost success. Below you’ll learn all about soil blocking and the best way to make sturdy cubes of soil for seed starting.
What is soil blocking
Soil blocking, a seed-starting technique developed and popularized by Eliot Coleman, uses small cubes of soil to grow seedlings. The block of soil is both the growing medium and the container and results in robust seedlings. The cubes are created with durable metal soil blockers that compress the growing mix into 3/4 inch, 1 1/2 inch, 2 inch, or 4 inch blocks. Depending on the dibble, the piece of plastic that makes an indentation in the top of the blocks as they’re formed, you can make soil blocks for seed starting (the rounded dibble) or transplanting (the square dibble). More on this below. I’ve had my soil blockers for many years and use them each spring and summer to produce thousands of soil cubes for seed starting.

Benefits of soil blocking
If you’re on the fence about soil blocking, let me share some of the many benefits of this seed-starting method. Here are 5 reasons to consider getting started with soil blocking:
- Produces vigorous seedlings with a dense root system – Soil blocking offers more root space than cell packs or plug trays and the roots are air pruned when they reach the outside edge of the soil cube. This results in dense root growth inside the block of soil. With cell packs or plug trays, the seedlings can become root-bound as they grow because the roots circle the inside of the container. This may cause transplant shock and set the seedlings back when they’re planted in the garden. Soil block seedlings transplant with no root disturbance.
- Less waste – Because this technique uses cubes of growing mix, there is little to no plastic waste. I re-use plastic 1020 plant trays to hold my soil cubes, washing and storing them in between uses.
- Economical – Soil blocking is a budget-friendly way to start seeds because you’re not buying pots, cell packs, and plug trays every spring. That said, there is the initial cost for the blockers. However, they are made from durable materials and last for decades.
- Less storage – With soil blocking, there’s no need to store a bunch of plastic pots or cell packs from season to season. For years I had bins of pots and cell packs taking up space in my garden shed. No more! Now I just have a stack of reusable trays and my soil blockers (and a much tidier garden shed).
- Versatile – There are different sized molds and several types of dibbles available which allow you to customize the soil blocks to fit your needs.
Types of blockers

As noted above, there are different types of blockers available from garden supply stores. I have four sizes, as well as a collection of round and square dibbles, but if you’re just starting out, you may want to invest in just one or two blockers. I recommend a small and a medium sized blocker which are perfect for all types of flower, vegetable, and herb seeds. More on the various options below:
The 3/4 inch blocker
This is the smallest soil blocker forming twenty 3/4 inch blocks of growing mix. I use these to start seeds that are slow to grow or that germinate best with bottom heat. Because they’re so small, you can place them on top of a heating mat. This warms the soil and speeds up germination. I’ve used these to start many types of edible and ornamental plants like peppers, tomatoes, eggplant, ground cherries, parsley, oregano, and pansies.

The 1 1/2 inch blocker
This is a medium-sized blocker that creates five 1 1/2 inch soil cubes. It’s not as widely used at the 2 inch blocker. I use both the 1 1/2 and 2 inch blockers for seeds that are ready in 4 to 6 weeks. These include zinnias, lettuce, cabbage, broccoli, cosmos, and basil.
The 2 inch blocker
The 2 inch blocker is the standard medium-sized soil blocker. It makes four 2 inch square cubes of growing mix. It has rounded dibbles which create a shallow impression for sowing seeds. However, you can remove the rounded dibbles and replace them with optional square dibbles. The square dibbles create 3/4 inch square indents. This allows the 3/4 inch soil blocks to be transplanted into the larger sized soil blocks as seedlings grow.

The 4 inch blocker
I don’t use this huge blocker for seed starting, but rather for transplanting. It forms 4 inch square blocks of soil with each having a 2 inch square indent in the middle. There are two ways to use this soil cube. First, you can add a 2 inch soil cube to the middle to create a large cube for seed starting. Or you can transplant seedlings that have outgrown their 2 inch soil cubes into this jumbo-sized soil block. These are great for quick-growing crops like pumpkins, gourds, and zucchini ensuring they have ample soil volume and don’t become root bound.
The best soil for soil blocking
Getting the soil right is essential for successful soil blocking. I’ve used many types of growing mediums: seed starting mix, all-purpose potting soil, and even made my own custom soil blocking mix. There are also growing mixes available for soil blocking, like the Johnny’s 512 Mix. Many soil block recipes for growing medium include ingredients like peat moss, coconut coir, coarse sand, compost, lime, greensand, blood meal, perlite, and vermiculite.
I found it to be time consuming to make my own mix, and therefore buy a seed-starting mix. I add extra compost and perlite to create a growing medium that holds its shape well. You may wish to buy a peat-free growing mix as peat is a non-renewable resource.

A step-by-step guide to soil blocking
Making soil blocks isn’t difficult, but it is messy. I make the blocks in my polytunnel, on my back deck (on a tarp), or on the grass, depending on the weather. You can also use a potting bench or other work surface.
Begin by gathering your supplies. You’ll need soil blockers, growing mix, trays, plant labels or tags, a waterproof marker or pencil, and a water source. I prefer using warm water so my hands don’t get cold. I also have a small tray of water near the soil blocking area so I can rinse my blockers clean in between uses.

Soil blocking basics: 4 steps to making soil blocks
Step 1 – Wet the growing mix
Fill a wide, flat-bottomed tub, bucket, or container with the growing medium. This type of container makes it easy to fill the cells of the blockers with the soil mixture. Next, wet the mix, moistening it to the consistency of wet cement. This is important because if the mix is too dry, the soil blocks will not hold together. When properly hydrated, the blocks last for months. The growing mix will be much wetter than needed for filling cell packs or pots. When you squeeze a handful, water should drip out of your hand.

Step 2 – Fill the blockers
Fill the blocker cells by pushing the blocker into the mix and pressing it down several times. I then take handfuls of the mix and press it into each cell to make sure they’re firmly packed and there are no air pockets. Once filled, I use a butter knife to scrape away any excess soil and create a flat bottom to each soil block.
Step 3 – Release the blocks
Move the filled blocker to the tray and release the cubes by squeezing the spring-loaded handle while raising the blocker up. This may take practice, but the soil blocks should slip out easily. If they crumble, toss them back into the soil container, checking to make sure the growing mix is wet enough. Don’t be discouraged if you need a few tries to master releasing the blocks. It took me a few minutes to get it right when I first started and now it’s quick and easy.

Step 4 – Rinse and repeat
It’s helpful to rinse the blocker in between uses to remove any potting mix clinging to the blocker. This prevents the next set of cubes from sticking to the blocker. Once clean, make more blocks until the tray is full.
Planting soil blocks
It’s easy to plant seeds in soil blocks because the small rounded dibble in the cells of soil blockers makes a little indentation for seed sowing. Drop 1 to 2 seeds in the indentation, covering them with enough growing mix so they’re planted to a depth one to two times their diameter. Mist the top of the block with water to ensure good soil-seed contact. Don’t forget to label that row of section of soil blocks with the type and variety of seed.

Transplanting into soil blocks
It’s not aways necessary to transplant soil blocks into larger sized cubes. I often sow my seeds in a 3/4 inch or 2 inch cubes and move these to the garden when the outdoor growing conditions are right. It’s all about timing. So if you start seeds indoors very early, you’ll likely need to transplant the seedlings into larger sized blocks to ensure strong, steady growth. As mentioned above, transplant 3/4 inch blocks into the larger 2-inch blocks. For transplanting, you need to make the 2-inch blocks with the square dibbles so the small cubes of soil slip perfectly into the larger blocks. After transplanting the seedlings I bottom water the blocks or spritz them with a water sprayer to ensure the roots have plenty of moisture to grow into the larger blocks.

Caring for the seedlings
It doesn’t take long for seeds to sprout and soon you’ll have a jungle of plants growing in your soil cubes. To help them thrive, keep these tips in mind:
- Watering – Watering soil blocks can be a tricky business. If you water the blocks themselves, they can collapse. It’s therefore best to bottom water by using a watering can to direct the flow of water between and around the blocks. I like to leave a half inch space in between the rows of blocks to allow room for me to water. Also don’t overwater the blocks, as that can cause algae to grow on the growing medium. It won’t hurt the plants, but it does look unsightly. I water when the outside surface is dry to the touch, but before the plants wilt. You can also use a mister to spritz water on the blocks.
- Transplanting – I offered a few tips on transplanting soil blocks above, but you’ll know it’s time to move them to a larger sized block (or into the garden) when the roots are visible along the edge of the cube.
- Fertilizing – Once the seedlings have several sets of true leaves, start to fertilize using a diluted liquid plant fertilizer every two to three weeks.

Troubleshooting when soil blocking
The last topic I want to cover is troubleshooting. I’ve found soil blocking to be an effective way to grow a lot of seedlings for my garden. But from time to time you may encounter challenges, so here are 3 issues to watch for:
- Blocks falling apart – There are a few reasons soil blocks don’t hold together. Maybe the growing mix was too dry when the blocks were formed, or perhaps you top watered and the flow of water caused them to crumble.
- Soil cubes sticking to the blocker – As you make soil blocks, it’s important to give the blocker a quick dip in water between each batch. This helps prevent sticking.
- Mold or algae growth – These are related to overwatering so consider your watering practice. Wait until the outside surface of the soil blocks are dry before bottom watering. You may also wish to add a small fan to the seed starting area to increase air flow.

For more information on starting seeds, be sure to read these articles:
- The best LED grow lights for seed starting
- How to grow zinnias from seed
- Growing basil from seeds: A complete guide
- When and how to plant tomato seeds
Are you interested in trying soil blocking?
Do you cover your trays once you’ve seeded the blocks? I’m trying to get away without covers but want to ensure the plants have the best chance of germination. Thanks!
I usually do with a plastic dome or plastic wrap as it does help with germination. And because I have a fan (set on low) in my seed-starting room, the soil dries out quicker.
Thank you for this information. I’ve been on the fence about buying soil blockers because I didn’t know which sizes to buy. I think I’ll buy some soul blockers.
Thank you. This was very helpful. I have ordered some and looking forward to starting my garden this way this year. I do have a few questions. How much perlite to add to the mix? Any suggestions on the compost? I don’t have a compost bin. How much compost to add to the mix.
Hi Matthew, good questions! I typically take my potting mix and place it in a flat bottomed container/tub. If I had 4 gallons of potting mix, I would add 1 gallon of compost and 1 gallon of perlite. You can buy bagged compost if you don’t have enough homemade… if you do use homemade compost just be sure to pick out any chunks or screen it so that it’s fine. Generally store-bought compost is already screened and is fine enough for soil blocking. Good luck!! Niki