This post may contain affiliate links. If you make a purchase through links on our site, we may earn a commission.
Malabar spinach, also known by the common names of Ceylon spinach, Indian spinach, vine spinach, and climbing spinach, is a heat-tolerant green with large, succulent leaves that are flavorful both raw and cooked. Its climbing growth habit means it takes up very little room in the garden. Plus, its prolific production translates to plenty of fresh greens to add to salads, stews, sautés, stir-fries, smoothies, and soups all summer long. In this article, I’ll share complete growing instructions for this easy-to-grow edible climber.

What is Malabar spinach?
Malabar spinach is unrelated to true spinach, but since Malabar thrives in hot weather (while true spinach, lettuce, and kale do not), it’s a wonderful way to grow your own delicious greens even during the dog days of summer. A native of India and other parts of tropical Asia, this productive, hot-weather-loving vine is a welcome addition to the garden.
There a few common species of Malabar spinach, Basella alba, Basella rubra (sometimes also referred to as Basella alba ‘Rubra’), and Basella cordifolia. The alba and cordifolia species have green stems and green leaves, while rubra has dark burgundy stems, pink veins, and leaves that are very dark green with a purple tinge as they age.
In addition to boasting large, delicious leaves, all varieties produce small white to pink flowers. The flowers are followed by dark purple berries (technically drupes) which are held close to the twining stems. The red pigment of the stems and berries is sometimes used as a dye, cosmetic, or food colorant in parts of Asia.
Malabar spinach is a frost-sensitive perennial that lives year-round in tropical climates where there are no freezing temperatures. In colder growing zones, including here in my Pennsylvania garden, it is grown as an annual crop, much like a tomato or eggplant. Next, let’s dive into what this green tastes like.

The flavor of climbing spinach
As a member of the plant family Basellaceae, Malabar spinach leaves are thick and succulent, with a mucilaginous texture. The taste is a lot like that of true spinach, some say with a hint of citrus tang. When cooked, I can’t tell the difference between Malabar and regular spinach. Raw, the mucilaginous nature of the leaves stands out a bit more, but it is not unpleasant.
The leaves of Malabar spinach are a rich source of vitamins A and C, folate, B vitamins, calcium, and antioxidants. Its nutritional value rivals that of true spinach.
Where to buy Malabar spinach seeds
Malabar spinach is not likely to be a vegetable you’ll find for sale as transplants at your local nursery. Instead, you’ll need to start your own plants from seed (see the next section for how to do this). Fortunately, climbing spinach seeds are available from several popular seed companies, including Burpee Seeds who has both red and green types. Purchase one pack of seeds to start because it only takes a few of these fast-growing plants to feed a family of four.

When to start climbing spinach seeds
Because Malabar spinach germinates and grows best in warm soil and air conditions, I start seeds indoors under grow lights about 8 to 10 weeks before my last frost is expected. Remember that Malabar spinach does not tolerate cold temps, so don’t start your seeds too early or the transplants will be ready for the garden before the weather and soil are warm enough.
How to grow Malabar spinach from seed
The seed coat of Malabar spinach seeds is quite hard. Scarify each seed by scraping it repeatedly with sandpaper or a metal file to improve germination speed and rates. Alternatively, soak the seeds in water for 24 hours prior to planting to soften the tough seed coat.
Sow seeds indoors under grow lights or in a sunny windowsill at the rate of 1 to 2 seeds per cell in a nursery cell-pack, or 1 to 2 seeds per peat pellet. Use a seedling heat mat to raise the soil temperature 10 degrees over room temperature to improve germination. Malabar spinach seeds are slow to germinate. Germination can take up to 3 weeks, so be patient.
Once the seedlings emerge, remove the heat mat and run the lights for 16 to 18 hours per day. Keep the young plants well-watered until you’re ready to harden them off 4 to 5 weeks later (here’s how). They are ready to transplant into the garden about 3 weeks after your last frost. Remember, don’t put them out too early. The soil should be between 65° and 75°F before moving the plants out into the garden.
Malabar spinach plants do not like to have their roots disturbed during transplanting. This is why I like to grow them in peat pellets. I just peel off the outer netting layer and plant it whole (see the photo below).
It is possible to start Malabar spinach by sowing the seeds directly into the garden, too. However, this is best for warm growing zones with long growing seasons. I’ve done it once or twice in my Pennsylvania garden but have been disappointed by a much later harvest over a shorter period of time.

Where to plant
If you live in a region where summer temperatures are warmer than 60°F on average, you can grow a good crop of Malabar spinach, but this tropical plant much prefers temperatures between 70 and 90°F, even thriving in temperatures that are warmer than that. The longer and hotter the growing season you have, the more leaves the plant will produce. In fact, it doesn’t really even get cranking and climbing until temperatures are downright hot.
Well-drained soils with ample organic matter are best. Full sun is ideal, but part shade in the afternoon works too, especially if you live in a hot southern region with high humidity.
Fertile soil results in plenty of healthy leaf growth. But growth is slow in cool temperatures. When summer’s heat amps up, watch out! This fast growing vegetable will take off.

Tips for trellising Malabar spinach
Malabar spinach climbs by wrapping its stems around a structure, such as a trellis, teepee, a string net, a porch railing, or wooden stakes. Interestingly, it always wraps in a counterclockwise direction. Climbing spinach does not produce smaller side tendrils like a pea plant. The green vines grow quickly and can reach up to 10 feet in height. A sturdy support is a must.

How often to water climbing spinach plants
Depending on your climate, you’ll likely need to water Malabar plants on a weekly basis if no rain occurs. Consistent moisture is key, especially if you live in a dry climate or if there is a drought. If the soil is too dry, the flavor is bitter.
Water deeply, but less frequently. I use a watering wand to target the water right at the base of the vines, letting it soak into the soil repeatedly, once per week. A 2-inch-thick layer of mulch in the form of shredded leaves, straw, or untreated grass clippings is helpful for reducing watering needs.
Fertilizing the vines
Unless you live in a tropical climate where this plant is a perennial, the vines will use lot of energy to generate a huge number of leaves in a single season. Regular harvests encourage the production of even more leaves, which requires the plant to have ample access to nutrition in the soil.
Soils high in organic matter are a must. Add a 2- to 3-inch layer of compost to your garden each year. You can supplement with a granular organic high-nitrogen fertilizer, such as bat guano or Burpee Organics, at the start of the growing season. The fertilizer should also contain moderate amounts of phosphorous and potassium to support healthy root growth and overall resilience.

When to harvest
Leaves and shoots can be harvested any time after the plant reaches a few feet in height. I like to start harvesting a modest number of leaves when the plants reach about 2 feet in height. Then, when they hit 3 to 4 feet tall, I increase the number of leaves I harvest. Always leave some vegetation on the stems to photosynthesize and support future vine and leaf growth.
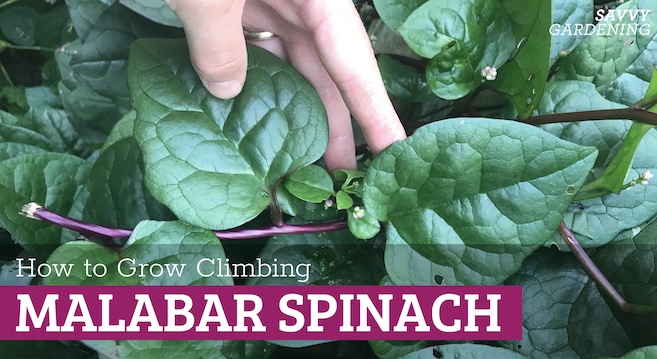
How to harvest Malabar spinach
To harvest the heart-shaped leaves, I find it easiest to use my thumb and forefinger to pinch each leaf off right where it joins the vine. Others may prefer to use a sharp knife or a needle-nose pruners to harvest Malabar spinach leaves.
To see the Malabar spinach growing in my garden, check out this video:
Eating raw or cooked
The leaves and tender stems can be eaten raw or cooked in many different ways. My husband loves to use it raw in smoothies. I like to sauté it and add it to lasagnas or use it in any recipe that calls for cooked spinach or Swiss chard in its list of ingredients. It’s also a great addition to a summer BLT in place of the L. Malabar spinach is used in the cuisines of many countries, including Indonesia, Sri Lanka, the Philippines, India China, Vietnam, Thailand, and many African countries as well.

Can Malabar spinach survive the winter?
If you live in USDA hardiness zone 10 where freezing temperatures don’t occur, then yes, Malabar spinach will survive the winter. Elsewhere, you should plan to grow it as an annual. Harvest all of the foliage at the first chance of frost so nothing goes to waste.
I do know of a gardener who grows her Malabar spinach in a pot. She moves the vine into her heated greenhouse for the winter. If you are lucky enough to have a heated greenhouse, you can try to do the same. Then move the pot back outdoors for the summer.
Potential problems
For the most part, climbing spinach is trouble-free (hooray!). There is no pest of note for this vegetable. The biggest potential problem is fungal leaf spot (Cercospora beticola). The symptoms of this disease on Malabar spinach are small brown ring structures on the leaves, likely followed by oval grey spots. Remove any leaves that show symptoms of this disease as soon as you spot it and toss them into the garbage, not on the compost pile.

Mighty Malabar
Because it is such an attractive plant, Malabar spinach makes a great addition to the ornamental landscape, too. Grow it with a rose up an arbor for an edible harvest in the heat of summer. Or combine it with some flowering annual vines, like firecracker vine or climbing nasturtiums, to grow over a pergola. Just be sure you’re harvesting leaves from the correct plant when you’re ready to dine.
For more unusual vegetables to grow, please visit these articles:
Pin this article to your Vegetable Gardening board for future reference. 
I live in Hawaii
we love Watching the Malabar vines grow and grow. Too much fun to see the vines… I hardly use them in our kitchen,.
I grow the red variety of Malabar spinach. Before the first frost last year, I took a few cuttings of the tops of the plants and put them in pots. They’ve been growing as house plants over the winter and actually look fine. They’re just growing in a south-facing window and still flowering.
I intend to put the plants out in the spring and see how they do, in addition to starting more seeds next year. It’s a great plant in the right climate.
What a clever way to overwinter the plants! You’ll have to let us know how they do.
In India, we use the leaves with lentils the preperation of which is called Daal. Eaten with rice.